Archive for the ‘FAQ’ Category
How to use Student’s attendance as to be as subject mark on the report card?
On the Basic Module
Step 1: Call the EDMS support to add in the ‘new subject’ for attendance count to be a subject mark.
Step 2:
Offer the subject for example ‘Attendance‘.
Click on (Curirculum Mgmt -> Subjects Offered -> Create & Update)
Step 3:
Create the timetable for the subject (Timetable Mgmt -> Timetable By Class)
or
i) Create staff timetable slot. (Timetable Mgmt->Staff Timetable Slot-> Staff-Subject Setup) and
ii) Assign the subject and class to staff for ‘Attendance’. (Staff Timetable Slot -> Create)
Step 4:
Enroll the subject (Timetable Mgmt-> Enrolment->By Class)
Step 5:
Select the Subject to E-report card Student Attendance Marks Integration (School Mgmt -> General Setting)
On E-report card.
Step 1: Setup the subject (Attendance) with the examination marks parameter
(Parameter Setup-> Subject Exam Setting Normal Exam)
Step 2: Input all the subject marks except ‘Attendance’ subject.
Exam Mgmt ~> Input Marks ~> By Subject & Class
Step 3: Produce the Class/Level Ranking.
Step 4. To adjust the attendance count go to (Exam Mgmt -> Class Result Adjustment).
i) Tick the (Attendance) Checkbox and Submit.
ii) The students name with other subject marks will get the attendance count. You may input the attendance count and click submit to save the record.
Step 5. To import the attendance count as marks, go to (Exam Mgmt-> Marks Intergration -> Student Attendance).
Choose the examination name, level, class and tick overwrite status to Yes.
The name list of class and the attendance marks will show, tick to import the attendance marks as subject marks and click submit to save record
Step 6. Produce Class/Level Ranking.
After done produce class ranking, you can proceed view or print the report card.
How to import SAPS data marks to EDMS?
The E-Report Card module allow you to import SAPS exam data to EDMS, with this features the class or subject teacher no need to key in student’s marks to EDMS. Only user role with assigned as ‘E-Report card (Exam Committee)’ is allow to do SAPS Data import.
Step 1: Pre-Requisite Setting in Basic Module
To start using Data Import from SAPS, you are must set up the basic instruction in order to allow SAPS import to EDMS.
- The subject initial from EDMS Basic Module must match as the SAPS Subject Code in various level. i.e. Subject initial for Bahasa Melayu subject should be set as “BM” as “SAPS”. On the basic module, you can check all the subject initial by go to Curriculum Mgmt ~ > Subject Info ~ > Code & Description ~ > Edit.
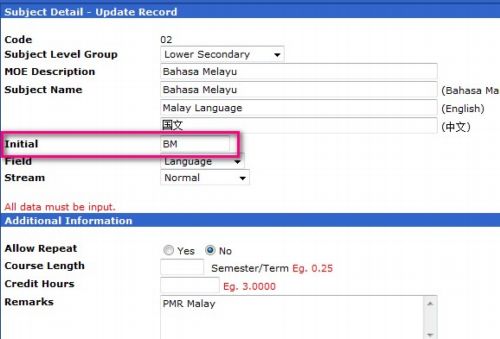
Screen 1: Subject initial use for mapping the subject code with SAPS
![]()
Screen 1b: Subject code on SAPS
- The student IC number is match from both SAPS & EDMS, that’s mean only match IC number will import marks to EDMS.
- Timetable for class is created respectively and subject is enrolled.
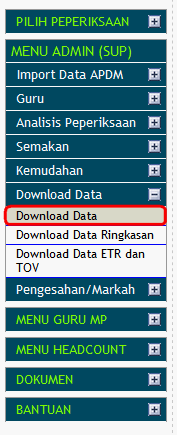
Step 2: Download the subject marks from the (SAPS online System)
To download the examination marks, please make sure all the students subject marks entered on the SAPS system. On the SAPS online, click on the Download Data as sample print screen as below.
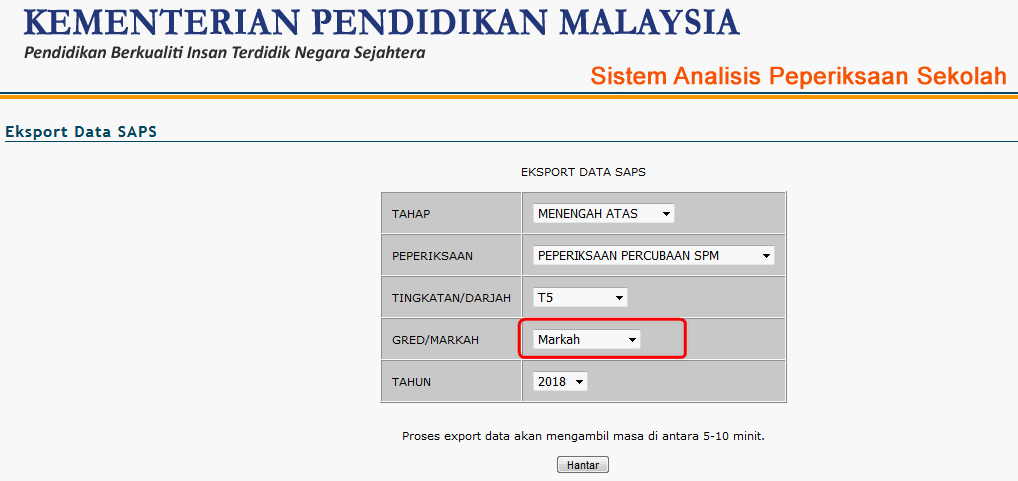
Step 3
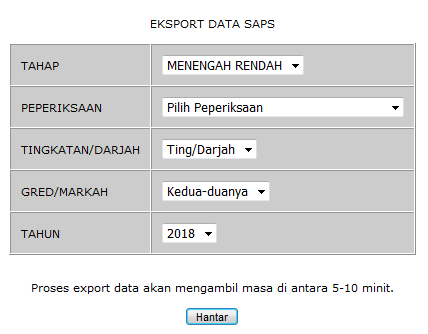
(For XLS format )
To export SAPS file to EDMS, please choose all relevent data and (Gred/Markah) must choose to ‘Markah‘ only. Click ‘Hantar’.
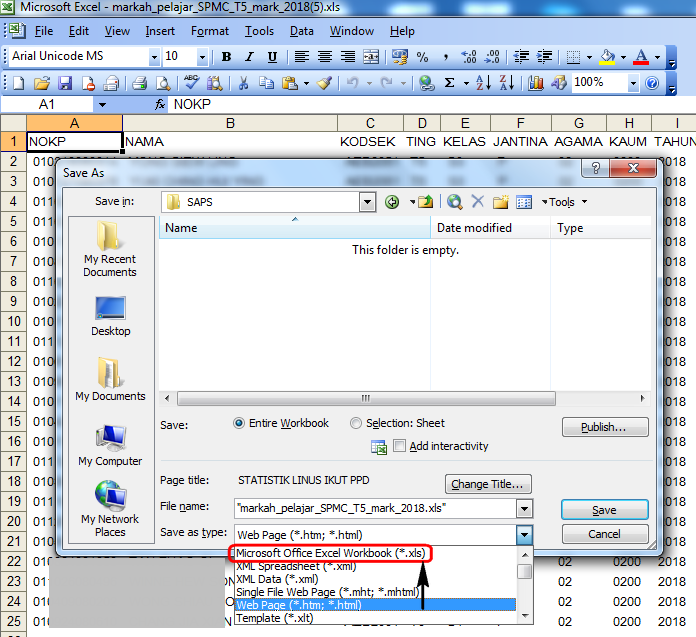
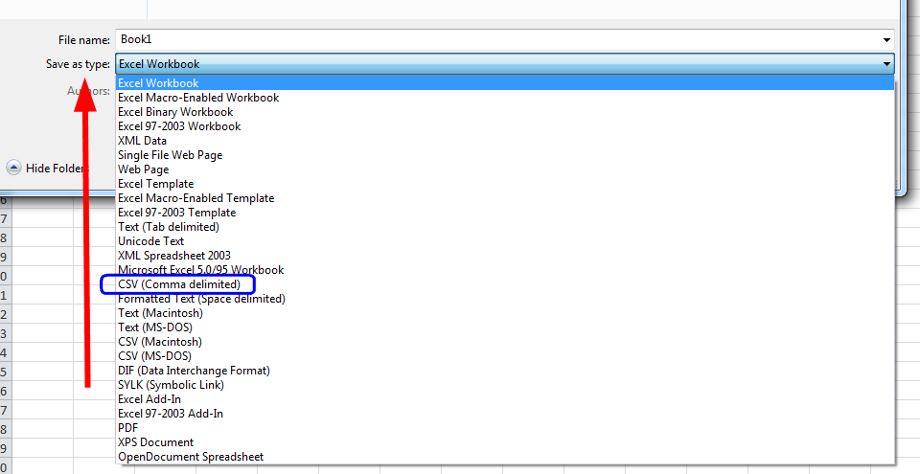
Next, open the download file with Microsoft Excel 2003, Save As the download file to .XLS format.
(if you skip this process, a error will prompt up after you import the file)
or
For CSV format
To export SAPS file to EDMS, please choose all relevent data and (Gred/Markah) must choose to ‘Kedua-duanya‘. Click ‘Hantar’.
Next, open the download file with Microsoft Excel 2007 onward, Save As the download file to .CSV (Coma delimited) format.
To import SAPS data import to EDMS,
Step 4: Get ready to import SAPS exam data into E – Report card Module
- The exam date selected for uploading the subject marks is still valid on the (Last Date To Change Result).
- To upload the SAPS Exam Mark Input into SMS, please go to Exam Mgmt ~ > Data Import from SAPS option as shown in screen below.
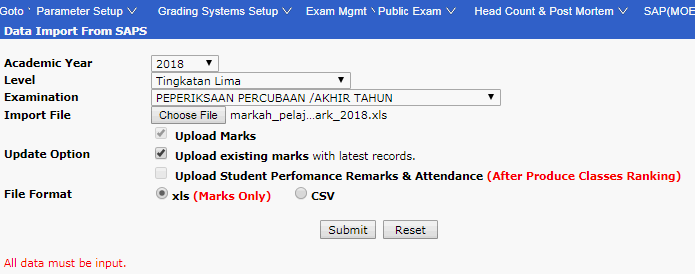
Update Option
| No. | Labeling | Description |
| 1 | Upload Marks | By default the the checkbox is tick. This use to upload the new marks to EDMS. |
| 2 | Upload existing Marks | Tick to overwrite the existing marks with the latest marks to EDMS. |
| 3 | Upload Student Performance & Attendance | Produce all class ranking(example all form 3 clases), before upload “Student Performance & Attendance”.
The checkbox is lock, if tick the ‘Upload existing Marks’. To upload student performance & attendance un-tick the ‘Upload exiting marks’ and tick Upload Student Performance & Attendance. |
Note: Choose the correct file with select the correct file format xls (Marks Only) or CSV to import the SAPS marks.
Please click on [Submit] button to update exam marks into SMS and entire form of that exam date will be imported into you selected exam from EDMS program.
Step 5: Run Class/Level Grading process to determine exam result analysis.
After the subject marks from SAPS is successfully imported, you shall run grading process for entire level form on you school to determine student ranking position in their class/level, Sum & average marks. The reason is SAPS grading program is might different with the grading system that setup in EDMS.
To do it, pls go to Exam Mgmt ~> Produce Class/Level Ranking.
To do auto grading schedule the class ranking process, you can use schedule class ranking process as cron job after school operation hour, pls click the link for more details.
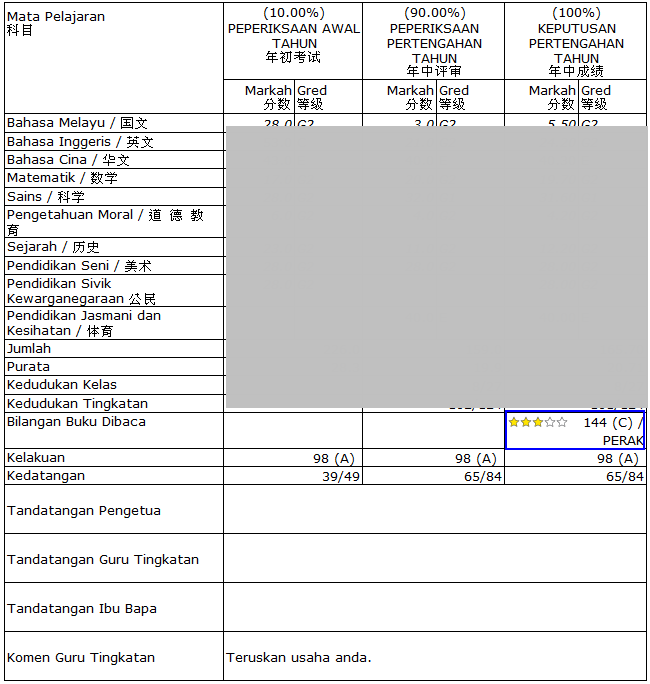
How to show Number of Books Read, STAR based on NILAM grading system on report card?
On this FAQ will show the step on how to show Number of Books Read, STAR, base on NILAM Grading system on report card format 1.
Step 1. (Library Module)
i) On Library Module, make sure NILAM grading is ready. To create/ maintain NILAM grading go to
Library Module ->Reports -> Reading Grade Table -> Create / Edit
Step 2: (E-report Card)
ii) On E-Report Card Module, Parameter Setup -> General Setting- Exam, find “Report Card No of Book Read Setting” and tick as follows:
-No of Book Read Value
-No of Book Read Grade
-No of Book Read Description
-No of Book Read Star
Step 3: (E-report Card)
iii) Parameter Setup -> Exam Schedule -> Result Display Setting -> School Exam -> Create and Update. Find and Tick No of Book Read.
Step 4: Produce Class Ranking, after completed, proceed print report card. The number of Star for book reads with NILAM grading system shown on report card.
How to incorporate Student Discipline Merit/Demerit (Current Year) Point As Subject Marks Into Report Card?
In Schools’ exam system, School Admin can facilitate their student conduct’s point given to students as a subjects mark into report card with the student discipline merit/demerit conduct point calculated under Discipline Module. Exam Committee or Admin may give the weightage to this subject and these marks will be calculated as a subject together with other academic subjects to derive the student’s average marks.
Followings are the illustrated example on how to incorporate Student Discipline Merit/Demerit (Current Year) Point As Subject Marks Into Report Card?
Step 1: Subject offered at Curriculum Mgmt
This is to ensure the Conduct Subject is selected as the subjects & offered for specify the settings for the subjects or paper. To select the subjects offered, go to Curriculum Mgmt ~> Subjects Offered ~> Create & Update. Tick the checkboxes of the “Offer” field to indicate that the subject is offered for that level. Click on the “Process” button to save the record.
Step 2: Assigned subject “Conduct” into daily class timetable.
User can choose 2 options available to insert “Conduct” subject slot into existing timetable.
Option 1: Creating Timetable by Staff
Option 2: Creating Timetable by Class
Upon confirmation of timetable, user can proceed with Subject Enrolment so that students’ conduct marks can be input via E-Report Card module or integrated with Student Discipline module.
Step 3: Setting up the Exam Subject Setting for Normal or Final Exam.
Upon enrolled the Subject for “Conduct”, user required to define the subject exam setting for normal/final exam, go to Parameter Setup ~> Subject Exam Setting ~> Normal Exam.
Step 4: Setting up “Conduct” subject at Discipline Module General Setting
On E-Report Card – Discipline Point Mark Integration (General setting) user may select Conduct subject for every level offer to retrieve student Current Discipline Point. To do this setting, go to Student Discipline Module, click on menu bar General Parameter->General setting.
Step 5: Fulfilment Current Student Discipline mark as Academic Performance.
After discipline teacher have completed entered Merit/Demerit cases on particular academic year to fulfil Conduct point mark as academic performance. To run this process, go to E-Report Card Module – Exam Mgmt ~ > Student Discipline Mark Update.
Step 6: Verify student’s Conduct mark on report card.
To verify imported student Conduct mark on E-Report Card module, User may verify the mark on Exam Mgmt~>Input Marks~>By Subject & Class or Exam Mgmt~>Input Marks~>By Student
How do we use New Form 6 Co-cu Assessment module?
1. What does school co-curriculum PK need to set up before start using the Form 6 Co-c0 module?
Note
Item mark with ** is specially customized to accommodated the new features for Form 6 on Co-curriculum Assessment.
For detailed steps to set up the parameters, please click on the link.
We can segregate the requirement set up as the followings:
Co-curriculum – Assessment Set Up
- ** General Setting
- Set Form 6 Offered to ‘Yes’ .
- Set Assessment Weightage Setup for Form 6
- Attendance: 50 Marks
- Position Held: 10 Marks
- Involvement: 10 Marks
- Achievement: 10 Marks
- Project
- Position: 10 Marks
- Implementation State: 10 Marks
- Minimum Activity Attendance Setup (Form 6): 15 Days across 2 years
- Activity Description
- Student Activity – Position
- ** Participants and Marks Involvement Set Up
- ** Achievement Marks Set Up
- ** Project Marks Set up
Bonus Marks Set Up
3. How does class or activity teacher key in student’s records?
Create Activity Record
- How to create student activity records?
For Form 6 students, the activity position must set up across for 2 years. For example start year 2017 to year 2018. - How to schedule the co-curriculum activities?
- How marking student attendance?
Marks Input
- How to input student’s involvement by student, By group or by batch?
- How to input student’s achievement by student or By group?
- How to input students Project?
- How to input EKTRAKURIKULUM?
Special Award
4. Assessment Grading for PK roles
How do we use the PAJSK features in Co-cu Assessment module?
-
System Housekeeping
Before accessing to Co Assessment Module, System Administrator must assign Co-Curriculum Assessment role to teacher in charge as tabulated below:-
| Role | Summaries of role access |
| Co-Curriculum Assessment (Guru) | I) Class Teacher allows to maintain their own class records as follows: create student’s activities, marking students, attendance input assessment, and SEGAK record.
II) Activities teacher allow to maintain their assigned activities as follows: Create student’s activities, marking students attendance, input assessment, and SEGAK record. |
| Co-Curriculum Assessment (PK) | This role is the most powerful roles on Co-Curriculum Assessment. The teacher assigned to this role can make changes on parameter setting and allow to create student’s activities, marks students attendance input assessment, SEGAK record, process assessment grading |
| Co-Curriculum Assessment (Setiausaha) | This role same as PK role, but no access to change the parameter setting. |
2. What does school co-curriculum PK need to set up before start using the PAJSK module?
Note
Item mark with * is a PAJSK function added on Co-curriculum Assessment.
For detailed steps to set up the parameters, please click on the link.
We can segregate the required set up into the followings:
Co-curriculum – Assessment Set Up
- * General Setting
- Activity Description
- Student Activity – Position
- Staff Activity – Position
- Grading System Set Up
- * Involvement Mark Set Up
- Achievement Marks Set Up
- * Commitment Setup
- * Contribution Service Setup
Bonus Marks Set Up
SEGAK Setup
3. How does class or activity teacher key in student’s records?
Activity Record
- How to create staff activity records?
- Who can manage the student activity records?
- How to create student activity records?
- How to schedule the co-curriculum activities?
- How to take student attendance?
Marks Input
- How to input student’s involvement by the student, By group or by batch?
- How to input student’s achievement by the student or By group?
- * How to input student’s commitment & contribution service?
- How to input EKTRAKURIKULUM?
Other Position Held
* Contribution Services, Nilam Program, TIMSS & PISA
SEGAK
4. Assessment Grading for PK roles
How to create new grading marks?
Issue: Our school want to use new form 3 grading marks but wanted to keep previous year grading marks for example PMR and PT3.
Solution
Step 1: Create new Form 3 name at Grading System Setup ~ > Exam Grade Table Setup ~ > Create.
Step 2. Create new form 3 grade Grading Table Setup-> Exam Grade Table Setup-> Create.
Step 3. If the marks already key-in on system, to updating marks with new grading
Go to Exam Mgmt ~> Mark Input ~ > By Class & Subject, re – update the each subject marks accordingly.
Step 4. Finally, go to Exam Mgmt ~ > Produce class/level ranking process, to automatically grade the exam marks and sort the position of the students in the class as well as in the level.
How to Determine Overall Subject’s Mark is Pass/Fail by Individual Paper?
A overall subject’s marks is pass or fail status can be determined by the individual paper offered by that subject. Any one of paper student who come to sit is fail, student is consider fail even overall paper marks for the final weightage is over the passing marks as set in the Grading System.
To define subject’s individual paper compulsory pass exam setup, go to Parameter Setup ~> Paper Exam Setting, then enable the “Compulsory Pass” setting checkbox.
Note that, this is applicable for the normal exam when the subject marks are to be input by paper.
How to use band score as student subject’s mark input?
Question:
My school would like to incorporate the PBS grade for each subject for all the Form 1 and Form 2 students. We do not want to use the marks. Instead, we just want a column in the report card, showing the grade that the student achieved.
Answer:
Please follow the step as below.
Step:
1. Define “PBS” as new grading system by go to E-Report Card ~ > Grading System Setup
- Replace Grade to Band from 1 to 5 or more based on the latest PBS score.
- Each band score for each mark range is tentatively defined mark range in order to reach maximum mark 100
2. Go to Basic Module ~ > Curriculum Mgnt ~ > Level Offered and setup “PBS” as Grading System for F1 & 2.
3. Go to Basic ~ > Curriculum Mgmt ~ > Subject Offered
- Use “Mark Input As” to mark and change the Ex. Grading to PBS grading system.
4. Go to E-Report Card ~ > Parameter ~ > Exam Schedule & Result Display Setting ~ > Create & Update
- Un-tick the subject marks checkbox at additional info to be displayed and other necessary information for example result status, class/level rank, sum, average and etc.
5. Go to E – Report Card ~ > Parameter ~ > Subject Exam Setting
- Choose Grading system to “PBS”.
- Un-tick the show the total marks checkbox and select PBS grading system.
6. Go to E – Report Card ~ > Exam Mgmt ~ > Marks Input ~ > By Subject & Class
- Input marks for subject marks.
- Note that only band scored define in PBS grading system is manage to enter as a subject marks for student.
7. Go to E – Report Card ~ > Exam Mgmt ~ > Produce Class Ranking
8. Go to E – Report Card ~ > Exam Mgmt ~> Report Card ~ > Print
How can I keep leading Zero in CSV files?
Question:
When I used export data as a CSV files, all of leading are cut off any number when I open file in EXCEL. How can I keep the zeros?

Answer:
This is actually Microsoft Excel issue. The program automatically truncates all leading zeros from numbers in CSV files. The key is to change at least the columns where the leading zeros occur (i.e. student’s IC number, phone and handphone) to “text.”
There are several options to do this. Start with the report open:
Step: (on Microsoft Excel XP)
1: Open a new worksheet in Excel
2. Open the menu path for Data -> Import External Data -> Import Data

3. Click on the From text button in the Get External Data section
4. Select your CSV file to import

5. Select the “Delimited” radio button — Text Import Wizard, Step i determines that your data is delimited
Step i
Click next.

Step ii
Make sure delimiters for Tab and comma is tick. Click next.

Step iii
Mark those columns format as “text” by clicking the radio button in the Column Data Format section.
NOTE:
You will need to do this for each column where the data contains leading zeros.
(ICNO, PHONE NO and HP PHONE)

Click Finish

6. Click Ok. The leading zeros will still be there in the new worksheet with the imported data.


