How to use existing timetable template for a new academic year?
Some schools may already have timetable template(s) created in previous academic year and would like to use the same template(s) for new academic year in view of the timetable cycle days, timeslots/periods and its duration for every period, recess / assembly time are remain unchanged. With this, SMS user is advised to perform all steps as illustrated below for creating a new timetable template for new academic year from existing ones. If your school has more than one timetable templates to be created based on existing ones, please repeat the same steps as illustrated below.
Step 1 – Link Level to Cycle Day
This is to assign the relationship between the Cycle Day to the levels offered by the school. To do this, please go to Timetable Mgmt ~> Parameter Setup ~> Cycle Day ~ > Link Level to Cycle Day.
Step 2 – Semester Start Day Set Up
This is to define the cycle day for each semester or term and determine which cycle day shall be the first schooling day for every semester or term. Eg, Semester 1 is having 5 cycle days and the second cycle day is the first schooling day of the semester. To set the semester start day, please go to Timetable Mgmt ~> Parameter Setup ~> Cycle Day ~ > Semester Start Day
Step 3 – Link Level to Block Template
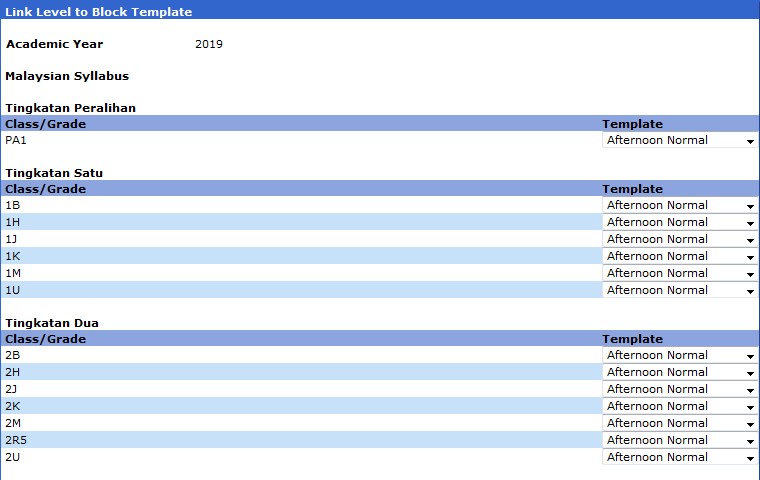
SMS users need to assign the level / class to the block template. Eg, Transition to Form 2 levels are using After Session Block Template whereas the rest of the levels are using Morning Session Block Template. To define block template and level relationship, please go to Timetable Mgmt ~> Parameter Setup ~> Block Template ~ > Link Level to Block Template.
Once the above steps are done, the timetable template(s) for new academic year shall be created successfully. SMS users can now proceed with the timetable creation, either by class or by staff. If you are using aSc Timetables Software for generating timetables, pls click on the link how to import generated timetables from aSc Timetables to iSchool SMS? for details.
How to import generated timetables from aSc Timetables to iSchool SMS?
As most of schools are using Third Party Timetable Software to generate timetables for classes, we’d customized a function to integrate with this third party Timetable Software ie aSc Timetables 2008/2009 (with version 2008.9.0 or with version 2009.14.5) with the aim to allow iSchool SMS timetable essential data to be exported and imported to aSc Timetables and also to import the generated timetables from aSc Timetables into iSchool SMS. This will eliminate duplicated data entry both in iSchool SMS and aSc Timetables Software.
For easy getting started with this function, we have divided the guides into 2 section ie
Section 1 – This section is applicable to the FIRST TIME USER of ASC 2008/2009 Timetable.
We will guide you step by step on how to export timetable essential data from iSchool SMS and thereafter import generated timetables from aSc Timetables to iSchool SMS. Please click on the link for details.
Section 2 – This section is applicable to the EXISTING USER of aSc Timetable 2008/2009.
We will guide you step by step on how to map the exported timetable timetable essential data from iSchool SMS with the existing parameters set up in aSc Timetable. This is to ensure data consistency for both systems and also to allow the generated timetables to be imported into iSchool SMS successfully. Please click on the link for details.
I had used aSc Timetables to generate school’s timetables before, how do I map iSchool SMS Timetable Essential Data with aSc Timetables?
The iSchool SMS is integrated with third party Timetable Software ie aSc Timetables 2008 or 2009 with the aim to allow iSchool SMS timetable essential data to be exported and imported to aSc Timetables and also to import the generated timetables from aSc Timetables into iSchool SMS. This will eliminate the duplicated data entry both in iSchool SMS and aSc Timetables 2008 and 2009 Software.
If you had used aSc Timetables to generate timetable for your school before, we assume that the school must have already set up all the required parameters in aSc Timetables which may be inconsistent with iSchool SMS. With this, the mapping of the iSchool SMS timetable essential data with aSc Timetables is the main task in order to allow import-export integration to work seamlessly to-and-fro between iSchool SMS and aSc Timetables. To get started, please follow the steps as illustrated below:
Step 1: To pre-qualify the Version runs by aSc Timetables Software
As not all the versions of aSc Timetables are having an XML export features, school user must ensure that their installed software is running aSc Timetables with version 2008 or 2009. This version is having an XML export features that allows import-export integration to work seamlessly to-and-fro between iSchool SMS and aSc Timetables. If your installed aSc Timetables version is without an XML export features, you can always go to the offical aSc Timetable site to download the latest version.
Step 2: To maintain a complete timetable essential data in iSchool SMS
Before exporting, iSchool SMS users must ensure that all the timetable essential data must be maintained completely in iSchool SMS in order to fulfill aSc Timetables 2008 XML import fields requirement. Followings are the required data to be exported from iSchool SMS:
a) Timetable Template where it usually represents as a grid with timetable days as column ie cycle day; and periods / timetable slots as rows that shows number of periods available in that particular day, and what time each period starts and the duration of that period. If your school requires more than 1 timetable templates eg 1 template for morning session and another template for afternoon session, please get ready both templates. To have a complete timetable template, please click on the link for details.
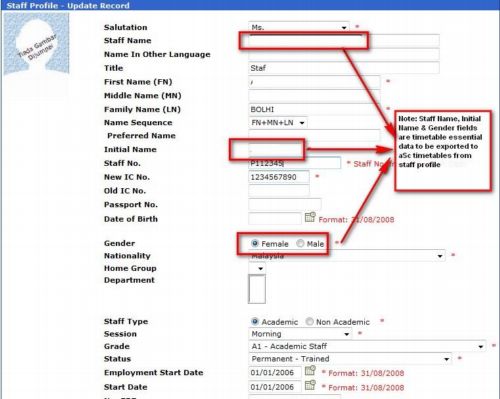
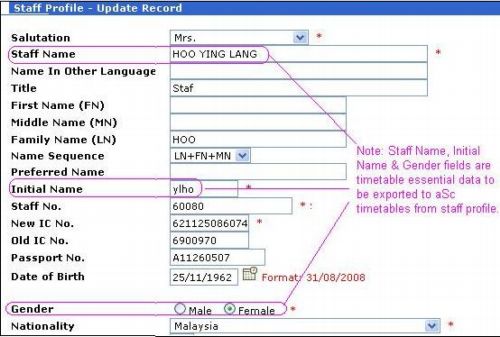
b) Teachers data where staff name, initial name and gender are the timetable essential fields to be exported to aSc Timetables. Please go to SMS Basic ~> Staff Management ~> Personal Record with the sample screen as below:
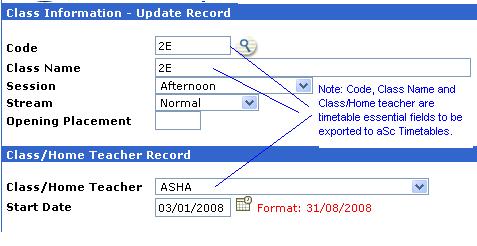
c) Class data where users must maintain class code, name and class teacher as timetable essential fields to be exported to aSc Timetables. Please go to SMS Basic ~> Curriculum Management ~> Class Details with sample screen as below:
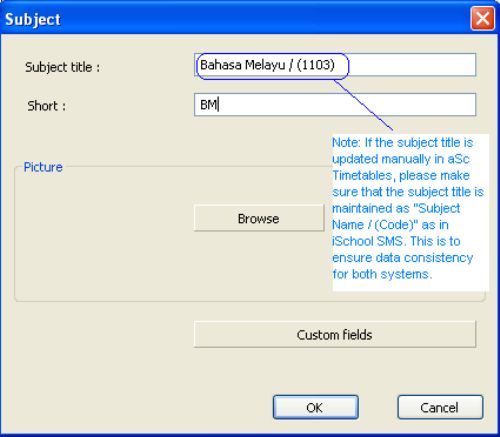
d) Subject data where Code, Subject Name and Initial are the timetable essential fields to be exported to aSc Timetable. SMS user is required to maintain for those subjects offered to respective level only. Please go to SMS Basic ~> Curriculum Management ~> Subject Info ~> Code and Description with sample screen as below.
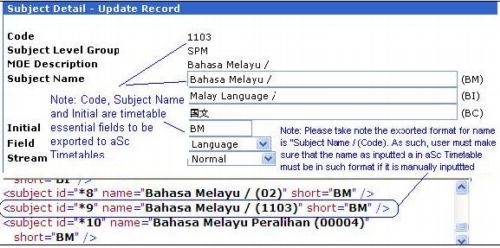
Please take note that the “Subject Title” field as updated in aSc Timetables is the combination of Subject Name and Code ie “Subject Name / (Code) eg, “Bahasa Melay / (1103). If SMS user prefers to update “Subject Title” manually in aSc timetable, please make sure that the subject title is maintained in such format for data consistency. Please refer to the sample screen as below.

Step 3 – Link the level to block template.
You must link the block template to the level or classes. If you skip this process, the Template will not export to ASC timetable. To do linking please click on Timetable Mgmt -> Parameter Setup ->Block Template -> Link Level to Block Template
Step 4 – To export required timetable essential data from iSchool SMS
To export the required data from iSchool SMS, please click on the link Timetable Mgmt ~ > Import & Export 3rd Party Timetable ~ > ASC ~ > Export Setting for details. Please take note that the exported file must be saved to a designated folder in your computer. If you have more than one timetable templates to be exported, please repeat the same process (Step 4).
Step 5 – To import extracted iSchool SMS – Timetable Essential Data to aSc Timetables
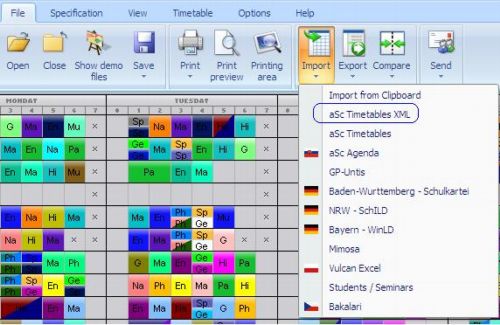
To import the extracted data into aSc Timetables Software, please access to aSc Timetables 2008 program and click on” Files” menu and choose “Import ~ > asc Timetable xml”

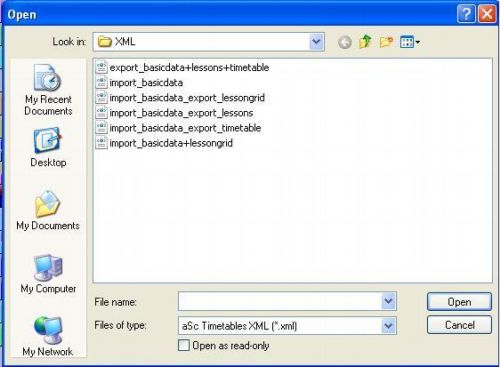
Choose the folder location file for data import to aSc Timetables. Please choose the device as C:/ASC and choose “asc_export.xml” files. Click OK button to continue.

Step 6 – To synchronize iSchool SMS timetable essential data with aSc Timetabls
Upon importing the extracted file successfully, user can proceed to map the iSchool SMS master data with ASC Timetable with the screen as shown below:
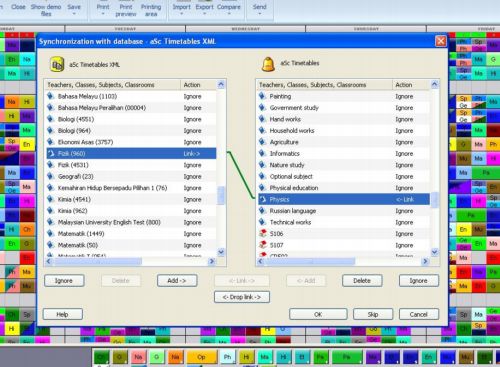
If the imported data and aSc Timetable data are matched, aSc timetable will auto-link both records. As for those un-linked records, user needs to map manually eg manually identify and link up the same records with different description, add new records if it is not found in aSc Timetables, delete irrelevant records, etc. To know the details, please refer to user guide of aSc Timetables 2008.
Step 7 – To set up parameters and simulate timetables in ASC Timetable
Once timetable essential data are synchronized and updated in aSc Timetables, users can proceed to set up required parameters in aSc Timetables for generating the desired class timetables. Users must take precautions not to make any changes on extracted timetable essential data in aSc Timetables in order to ensure the data consistency in both systems.
If the timetable essential data is required to change in aSc Timetables, please make sure that the same changes must update in iSchool SMS also. However, if the changes required much effort, user is advised to update the timetable essential data in iSchool SMS (step 1) ; re-export the data (step 2 ) and; re-import into aSc Timetables and overwrite the previous records. Thereafter, please set up all the required parameters before generating timetables. User is able to gnerate different versions of timetables for different parameters set up for preview and decision making.
Step 8 – To export generated timetables from aSc Timetables
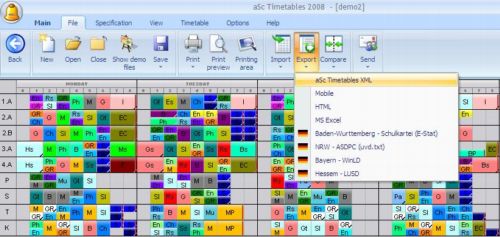
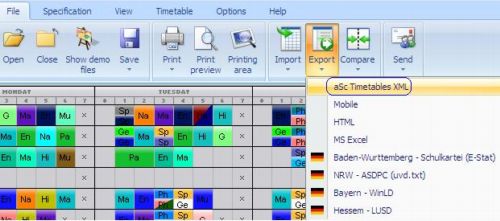
To export generated timetables from aSc Timetables, go to File~> Export ~> aSc Timetable xml and ensure that the exported files are saved in designated folder.
Step 9 – To import generated timetables into iSchool SMS
To import generated timetable, please click on the link Timetable Mgmt ~ > Import & Export 3rd Party Timetable ~ > ASC ~ > Import Timetable for details.
Step 10 – To preview Master Timetable – By class or By staff
Once the generated timetables are imported, users are able to preview the generated timetables in iSchool SMS, either by class or by staff. To preview the generated timetable, please click on the link Timetable Mgmt ~ > Import & Export 3rd Party Program ~ > ASC ~ > Master Timetable Preview for details. A complete timetable in cycle day format can be previewed also.
Please take note that the generated timetable data is not editable. Even though certain periods/slots may not fulfill requirement, user is still required to choose the best generated timetable to be officially implemented to the school. Once the timetable is confirmed, user can edit the timetable slots either by class or by staff subsequently.
Step 11 – To confirm Official Timetable for the school
To confirm an official Timetable for the school, please click on the link Timetable Mgmt ~ > Import & Export 3rd Party Program ~ > ASC ~ > Timetable Confirmation for details.
Step 12 – To edit Confirmed Timetable
There could be some changes required after the timetable is confirmed. User is able to edit the timetables either by class or by staff.
I am the First Time user of aSc Timetables Software, how do I synchronize timetable essential data from iSchool SMS to aSc Timetable?
The iSchool SMS is integrated with third party Timetable Software ie aSc Timetables with the aim to allow the timetable essential data exported from iSchool SMS and imported to aSc Timetables and also to import the generated timetables from aSc Timetables to iSchool SMS. This will eliminate the duplicated data entry both in iSchool SMS and aSc Timetables Software.
If you are the first time user of aSc Timetables, we assume the school has just installed aSc Timetables Software with blank database. To get started, please follow the steps as illustrated below:
Step 1: To pre-qualify the Version runs by aSc Timetables Software
As not all the versions of aSc Timetables are having an XML export features, school user must ensure that their installed software is running aSc Timetables 2008 with version no. 2008.9.0 or aSc Timetable 2009 with version 2009.14.5. This version is having an XML export features that allows import-export integration to work seamlessly to-and-fro between iSchool SMS and aSc Timetables. If your installed aSc Timetables version is without an XML export features, you can always go to live site http://www.asctimetables.com to download the latest version.
Step 2: To maintain a complete timetable essential data in iSchool SMS
Before exporting, iSchool SMS users must ensure that all the timetable essential data must be maintained completely in iSchool SMS in order to fulfill aSc Timetables 2008 XML import fields requirement. Followings are the required data to be exported from iSchool SMS:
a) Timetable Template where it usually represents as a grid with timetable days as column ie cycle day; and periods / timetable slots as rows that shows number of periods available in that particular day, and what time each period starts and the duration of that period. If your school requires more than 1 timetable templates eg 1 template for morning session and another template for afternoon session, please get ready both templates. To have a complete timetable template , please click on the link for details.
b) Teachers data where staff name, initial name and gender are the timetable essential fields to be exported to aSc Timetables. Please go to SMS Basic ~> Staff Management ~> Personal Record with the sample screen as below:
c) Class data where users must maintain class code, name and class teacher as timetable essential fields to be exported to aSc Timetables. Please go to SMS Basic ~> Curriculum Management ~> Class Details with sample screen as below:

d) Subject data where Code, Subject Name and Initial are the timetable essential fields to be exported to aSc Timetable. SMS user is required to maintain for those subjects offered to respective level only. Please go to SMS Basic ~> Curriculum Management ~> Subject Info ~> Code and Description with sample screen as below.

Please take note that the “Subject Title” field as updated in aSc Timetables is the combination of Subject Name and Code ie “Subject Name / (Code) eg, “Bahasa Melay / (1103). If SMS user prefers to update “Subject Title” manually in aSc timetable, please make sure that the subject title is maintained in such format for data consistency. Please refer to the sample screen as below.
Step 3 – To export required timetable essential data from iSchool SMS
To export the required data from iSchool SMS, please click on the link Timetable Mgmt ~ > Import & Export 3rd Party Timetable ~ > ASC ~ > Export Setting for details. Please take note that the exported file must be saved to a designated folder in your computer. If you have more than one timetable templates to be exported, please repeat the same process.
Step 4 – To import extracted iSchool SMS – Timetable Essential Data to aSc Timetables
To import the extracted data into aSc Timetables Software, please access to aSc Timetables 2008 program and click on” Files” menu and choose “Import ~ > asc Timetable xml”
Choose the folder location file for data import to aSc Timetables. Please choose the device as C:/ASC and choose “asc_export.xml” files. Click OK button to continue.
Step 5 – To set up parameters and generate timetables in aSc Timetables
Upon importing the file successfully, user can proceed to set up required parameters in aSc Timetables for generating the desired class timetables. Users must take precautions not to make any changes on extracted timetable essential data in aSc Timetables in order to ensure the data consistency in both systems.
If the timetable essential data is required to change in aSc Timetables, please make sure that the same changes must update in iSchool SMS also. However, if the changes required much effort, user is advised to update the timetable essential data in iSchool SMS (step 1) ; re-export the data (step 2 ) and; re-import into aSc Timetables and overwrite the previous records. Thereafter, please proceed to set up all the required parameters before generating. User is able to generate different versions of timetables for different parameters set up for preview and decision making.
Step 6 – To export generated timetables from aSc Timetable
To export generated timetables, please access to ASC Timetime and go to File ~> Export ~> aSc Timetable and ensure that the exported file is saved in designated folder in your computer.
Step 7 – To import generated timetables into iSchool SMS
To import generated timetables to iSchool SMS, please click on the link Timetable Mgmt ~ > Import & Export 3rd Party Timetable ~ > ASC ~ > Import Timetable for details.
Step 8 – To preview Master Timetable – By class or By staff
Once the generated timetables are imported, users are now able to preview the generated timetables in iSchool SMS, either by class or by staff. To preview the generated timetable, please click on the link Timetable Mgmt ~ > Import & Export 3rd Party Program ~ > ASC ~ > Master Timetable Preview for details. A complete timetable in cycle day format can be previewed also.
Please take note that the generated timetable data is not editable. Even though certain periods/slots may not fulfill requirement, user is still required to choose the best generated timetable to be officially implemented to the school. Once the timetable is confirmed, user can edit the timetable slots either by class or by staff subsequently.
Step 9 – To confirm Official Timetable for the school
To confirm an official Timetable for the school, please click on the link Timetable Mgmt ~ > Import & Export 3rd Party Program ~ > ASC ~ > Timetable Confirmation for details.
Step 10 – To edit Confirmed Timetable
There could be some changes required after the timetable is confirmed. User is able to edit the timetables either by class or by staff.
I’d created a timetable slot successfully, but why it did not display on timetable creation page?
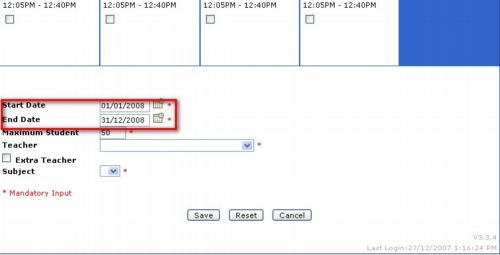
This is because timetable creation page has checking at start date and end date duration period to control display existing valid timetable slot records, therefore timetable slots beyond the effective date will not be displayed for simplicity. User can still using edit function to verify the timetable slot created.
Do I need to create timetable for new academic year before processing students?
It is not necessarily for user to create the timetable before the student rollover process. The system allowed user to create the time table template but user can’t complete the timetable creation as user can’t enrolled the student in the current academic year to the new academic year timetable unless the student rollover had been done.
To proceed with the creation of the timetable without annoying the rollover process, the academic year need to be define into the system.
To define the new academic year, please go to Curriculum Mgmt ~> Academic Year ~> Create.
After completed define the new academic year, user may copy the level offered from current year to the new academic year. To copy the level to be offered, please go to Curriculum Mgmt ~> Level Details ~> Copy Previous Year.
Once done with the level, user need to copy the subject which had been taught in the current year to the new academic year. To proceed with the copying, please go to Curriculum Mgmt ~> Subject Offered ~> Copy Previous Year.
As the level and subject had been copied over, user also need to copy the class details. To do so, user may go to Curriculum Mgmt ~> Class Details ~> Copy Previous Year.
After completed, user may create the timetable for the new academic year. To create the timetable, we recommend for the school to use input by class. To do so, please go to Timetable Mgmt ~> Timetable by Class ~> Create.
The timetable had not yet complete as student had not been enrolled to the subject as the rollover has not been process. User may complete the enrollment after the student rollover process to the new academic year had been done. User may go to Timetable Mgmt ~> Enrollment ~> By Class to enrolled the subject to the student by class.
How to degrade a student to lower form eg from Form 1 to Transition in the middle of the academic year?
To change the Student from upper to lower form, Please follow steps as below:
Step 1 – De-enroll the subject taken by student via Timetable Mgmt ~ > Subject Enrolment by student
This is for you to de – enroll the particular student’s subject taken from the current Class.
Step 2 – Inactivate student profile via Student Mgmt ~ > Personal Profile ~ > Delete
The purpose of this step is for you to remove the student’s current Form & class
Step 3 – Re-activate student profile via Student Mgmt ~ > Personal Profile ~ > Reinstate
You can retrieve the deleted Students records by using the reinstate option. User may use this reinstate option to put back the student data to the latest running level & class
Step 4 – Enrol subject taken by student via Timetable ~ > Subject Enrollment by Class
This is for you to enroll the subjects taken by student where he/she residing in the new class.
If I want to create timetable manually, what do I need to do?
When the timetable for new academic year is much different from previous year, SMS user is advised to select SMS Auto Scheduling Module to generate timetable for new academic year. However, if the School does not implemented SMS Auto Scheduling Module, SMS user needs to prepare the required timetable outside SMS system and thereafter manually input the timetable by class into SMS system.
There are 8 steps the SMS user needs to do for creating timetable by class for new academic year. If there is changes on timetable general setting, cycle day, timetable template, recess / assembly group, user has to perform all steps as illustrated below. On the other hand, if there is no changes on timetable general getting, cycle day, timetable template, recess / assembly group, SMS user needs to perform Step 4, 6 and 8 only.
Step1 – Timetable General Setting
This is to set up the processing options for timetable as required by the School. Eg, to define the timetable start time and end time; recess and assembly; printing and displaying the timetable and so on. To set up the timetable requirement, please go to Timetable Mgmt ~> General Setting.
Step 2 – Define Cycle Day
This is to define the number of days a timetable template will have. Users will use this template to rotate the subjects offered in the school, instead of repeating the timetable week by week. For example, if the School adopts 3-day cycle which means that a timetable will have a 3-day template. After the third day, the timetable will go back to day cycle 1. To create a new cycle day and its name, please go to Timetable Mgmt ~> Parameter Setup ~> Cycle Day ~> Create and Timetable Mgmt ~> Parameter Setup ~> Cycle Day Setup.
Step 3 – Link Level to Cycle Day
This is to define the relationship between the Cycle Day to the levels that have been offered by the school. To do this, please go to Timetable Mgmt ~> Parameter Setup ~> Link Level to Cycle Day.
Step 4 – Semester Start Day Set Up
This is to define the cycle day and the first day of each semester or term. Eg, The cycle day for Semester 1 is 5 days and 2 cycle day is the first day of the semester. To set the semester start day, please go to Timetable Mgmt ~> Parameter Setup ~> Semester Start Day.
Step 5 – Timetable Block Template Set Up
Block template is where SMS user creates the “frame” of a timetable by inputting the day cycle, time and number of periods for time slots creation. This created template will then be used for inputting the subject and teacher for each allocated slot. To define a timetable template, please go to Timetable Mgmt ~> Parameter Setup ~> Block Template ~> Create.
Step 6 – Link Level to Block Template
Upon creation of the block template, SMS users need to link the level / class to the block template. To define block template and level relationship, please go to Timetable Mgmt ~> Parameter Setup ~> Link Level to Block Template.
Step 7 – Create Assembly / Recess Group
This is to define the Recess / Assembly Group for staff and student eg for morning and after session. To define assembly group, please go to Timetable Mgmt ~> Parameter Setup ~> Slot Type ~> Assembly Group ~> Create. To define the recess group, please go to Timetable Mgmt ~> Parameter Setup ~> Slot Type ~> Recess Group ~> Create.
Step 8 – Create Timetable by Class
When the setting for timetable is completed, SMS user can proceed with the creation of timetable for new academic year. To create the timetable by class, please go to Timetable Mgmt ~> Timetable By Class ~> Create.
Is there any automated Timetable program that I can use?
SMS Auto Timetabling is one of the options available for generating timetable for new academic year. When the timetable for new academic year is much different from previous year, SMS user is advised to select SMS Auto Scheduling Module to generate timetable for new academic year. There are 13 steps the SMS user needs to do in order to auto schedule the timetable. If there are changes in timetable general setting, cycle day, timetable template, recess / assembly group, SMS user needs to perform all steps as illustrated below. On the other hand, if there is no changes on the mentioned items, SMS needs to perform Step 5, 7 and 9 onward
Step 1- Set Up Level, Class & Subject Offered
SMS user has to ensure that level, class and subject offered for the new academic year have been set up. To offer the level, please go to . To offer the subject, please go to Curriculum Mgmt ~> Subjects Offered ~> Create & Update.To create the class, please go to Curriculum Mgmt ~> Class Details ~> Create.
Step 2 – Timetable General Setting
This is to set up the processing options for timetable as required by the School. Eg, to define the timetable start time and end time; recess and assembly; printing and displaying the timetable and so on. To set up the timetable requirement, please go to Timetable Mgmt ~> General Setting.
Step 3 – Define Cycle Day
This is to define the number of days a timetable template will have. Users will use this template to rotate the subjects offered in the school, instead of repeating the timetable week by week. For example, if the School adopts 3-day cycle which means that a timetable will have a 3-day template. After the third day, the timetable will go back to day cycle 1. To create a new cycle day and its name, please go to Timetable Mgmt ~> Parameter Setup ~> Cycle Day ~> Create and Timetable Mgmt ~> Parameter Setup ~> Cycle Day Setup.
Step 4 – Link Level to Cycle Day
This is to define the relationship between the Cycle Day to the levels that have been offered by the school. To do this, please go to Timetable Mgmt ~> ParameterSetup ~> Link Level to Cycle Day.
Step 5 – Semester Start Day Set Up
This is to define the cycle day and the first day of each semester or term. Eg, The cycle day for Semester 1 is 5 days and 2 cycle day is the first day of the semester. To set the semester start day, please go to Timetable Mgmt ~> Parameter Setup ~> Semester Start Day.
Step 6 – Timetable Block Template Set Up
Block template is where SMS user creates the “frame” of a timetable by inputting the day cycle, time and number of periods for time slots creation. This created template will then be used for inputting the subject and teacher for each allocated slot. To define a timetable template, please go to Timetable Mgmt ~> Parameter Setup ~> Block Template ~> Create.
Step 7 – Link Level to Block Template
Upon creation of the block template, SMS users need to link the level / class to the block template. To define block template and level relationship, please go to Timetable Mgmt ~> Parameter Setup ~> Link Level to Block Template.
Step 8 – Create Assembly / Recess Group
This is to define the Recess / Assembly Group for staff and student eg for morning and after session. To define assembly group, please go to Timetable Mgmt ~> Parameter Setup ~> Slot Type ~> Assembly Group ~> Create. To define the recess group, please go to Timetable Mgmt ~> Parameter Setup ~> Slot Type ~> Recess Group ~> Create.
Step 9 – Auto Timetable General Setting
SMS user needs to define the maximum continuous teaching period per day, maximum / minimum teaching period per day /week and so on. To setup the general settings for auto timetable, please go to Auto Timetable ~> Timetable Parameter ~> General Setting.
Besides, if committee forms part of the reasons for blocking certain timetable slots from scheduling, SMS user is required to create the committee. If the selected committee type is panitia, the created committee is required to assign to the level of subject code for which the committee is responsible. Eg Bahasa Malaysia Committee is responsible for BM subject for Transition and Form 1. To do this, please go to Auto Timetable ~> Timetable Parameter ~> Group ~> Description ~> Create. Thereafter, SMS user needs to assign teacher in charge for the committee for the new academic year. To do this, please go to Auto Timetable ~> Timetable Parameter ~> Group ~> Custom.
In the event whereby there is not enough teacher to teach certain subject for new academic year, some classes need to be combined and thereafter assigned the subject teacher. To joint these classes, please go to Auto Timetable ~> Timetable Parameter ~> Joint Group Setup.
Step 10 – Resources and Constraints Building
There are two activities need to be performed in this step. The first activity is to distribute the subject and allocate the resources by class, subject and teacher in term of number of teaching periods within the cycle day. To do this, please go to Auto Timetable ~> Timetable Parameter ~> Class and Subject.
The second activity is to block only the necessary timetable slots from assignment while simulating the timetable. The block type can be by Committee (Panitia / Custom) or by location (Classroom / Non classroom) or by subject or by staff or by class. SMS User has to bear in mind that the more blocking reasons are assignd, the less will be the percentage of timetable slots assignment by the system. To do this, please go to Auto Timetable ~> Timetable Parameter ~> Group and Slot Block Set Up.
Step 11 – Timetable Simulating
SMS user is allowed to simulate the timetable; and thereafter preview the simulated timetable before confirmation. As long as the timetable for the academic year is not yet confirmed, user is allowed to process simulation in numerous times with the assignment of different case number. System will display a statistical report on the percentage of completion of timetable by class after each simulation. SMS user needs to know that the percentage of completion of timetable by class will be varied for each simulation even though the auto timetable parameter is remain unchanged for each simulation. To simulate the timetable, please go to . To preview the simulated timetable, please go to Auto Timetable ~> Enquiry.
Step 12 – Maintain Timetable Manually
SMS user is allowed to maintain the simulated timetable manually by inserting the subject and teacher for the empty slots or make changes on the assigned slots. Only the chosen timetable for new academic year is required to be maintained. To maintain the simulated timetable, please go to Auto Timetable ~> Manual Maintenance of Timetable.
Step 13 – Timetable Confirmation
Upon completion of timetable maintenance, user needs to confirm the chosen timetable as official timetable for new academic year. To do this, please go to Auto Timetable ~> Auto Scheduling of Timetable ~> Confirmation of Timetable.
When can I start to enrol the subject? What do I need to do?
Subjects can only be enrolled after timetable (s) for new academic year has (have) been created. There are three options to enrol the subject.
Option 1 – Subject Enrolment by Subject
Student enrolment by subject allows same level students to enrol a subject at a time. To enrol students by subject, please go to Timetable Mgmt ~> Student-Subject Enrolment ~> By Subject.
Option 2 – Subject Enrolment by Student
Student enrolment by student allows a student to enrol many subjects at a time. To enrol student for subjects, please go to Timetable Mgmt ~> Student-Subject Enrolment ~> By Student.
Option 3 -Subject Enrolment by Class
Student enrolment by class allows same level classes to enrol for many subjects at a time. To perform subject enrolment by class, please go to Timetable Mgmt ~> Student-Subject Enrolment ~> By Class.


