Archive for the ‘Basic’ Category
How to use Student’s attendance as to be as subject mark on the report card?
On the Basic Module
Step 1: Call the EDMS support to add in the ‘new subject’ for attendance count to be a subject mark.
Step 2:
Offer the subject for example ‘Attendance‘.
Click on (Curirculum Mgmt -> Subjects Offered -> Create & Update)
Step 3:
Create the timetable for the subject (Timetable Mgmt -> Timetable By Class)
or
i) Create staff timetable slot. (Timetable Mgmt->Staff Timetable Slot-> Staff-Subject Setup) and
ii) Assign the subject and class to staff for ‘Attendance’. (Staff Timetable Slot -> Create)
Step 4:
Enroll the subject (Timetable Mgmt-> Enrolment->By Class)
Step 5:
Select the Subject to E-report card Student Attendance Marks Integration (School Mgmt -> General Setting)
On E-report card.
Step 1: Setup the subject (Attendance) with the examination marks parameter
(Parameter Setup-> Subject Exam Setting Normal Exam)
Step 2: Input all the subject marks except ‘Attendance’ subject.
Exam Mgmt ~> Input Marks ~> By Subject & Class
Step 3: Produce the Class/Level Ranking.
Step 4. To adjust the attendance count go to (Exam Mgmt -> Class Result Adjustment).
i) Tick the (Attendance) Checkbox and Submit.
ii) The students name with other subject marks will get the attendance count. You may input the attendance count and click submit to save the record.
Step 5. To import the attendance count as marks, go to (Exam Mgmt-> Marks Intergration -> Student Attendance).
Choose the examination name, level, class and tick overwrite status to Yes.
The name list of class and the attendance marks will show, tick to import the attendance marks as subject marks and click submit to save record
Step 6. Produce Class/Level Ranking.
After done produce class ranking, you can proceed view or print the report card.
How can I keep leading Zero in CSV files?
Question:
When I used export data as a CSV files, all of leading are cut off any number when I open file in EXCEL. How can I keep the zeros?
Answer:
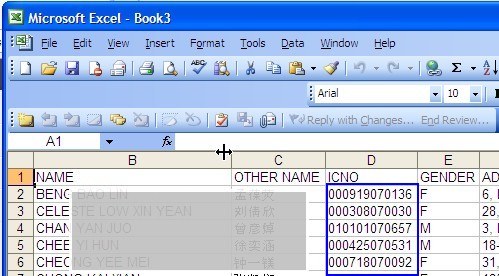
This is actually Microsoft Excel issue. The program automatically truncates all leading zeros from numbers in CSV files. The key is to change at least the columns where the leading zeros occur (i.e. student’s IC number, phone and handphone) to “text.”
There are several options to do this. Start with the report open:
Step: (on Microsoft Excel XP)
1: Open a new worksheet in Excel
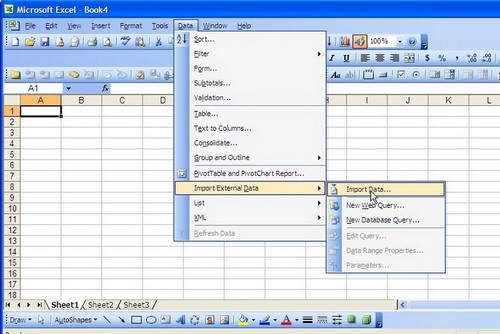
2. Open the menu path for Data -> Import External Data -> Import Data
3. Click on the From text button in the Get External Data section
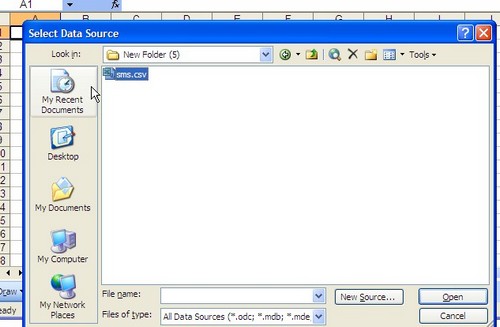
4. Select your CSV file to import
5. Select the “Delimited” radio button — Text Import Wizard, Step i determines that your data is delimited
Step i
Click next.
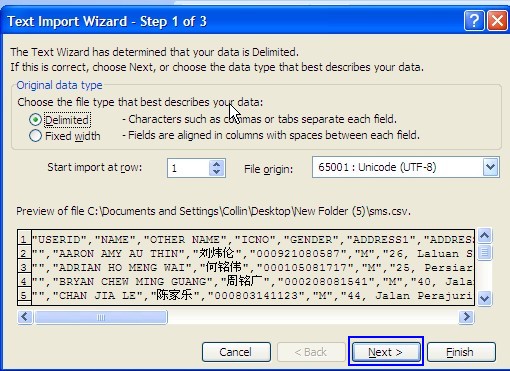
Step ii
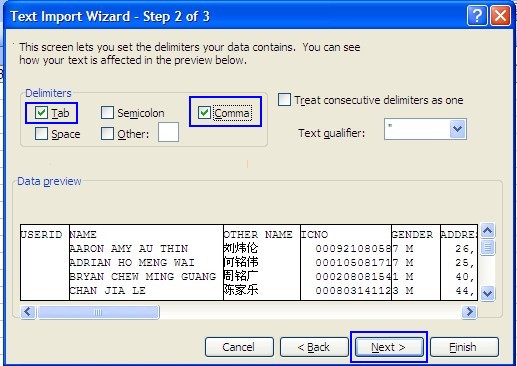
Make sure delimiters for Tab and comma is tick. Click next.
Step iii
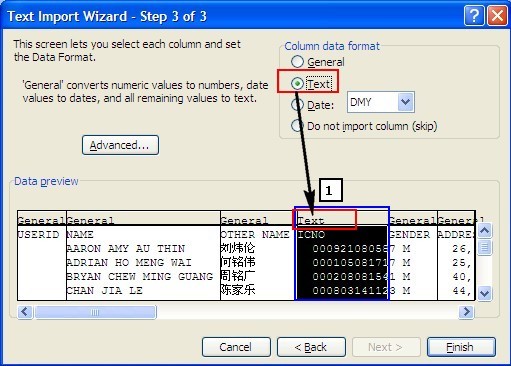
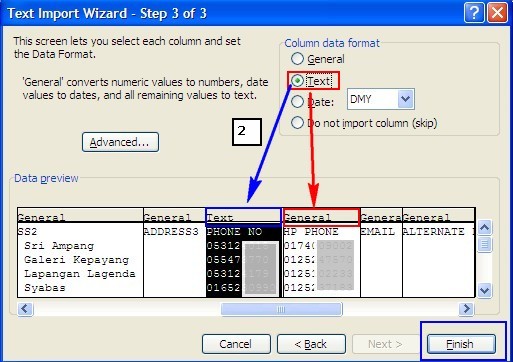
Mark those columns format as “text” by clicking the radio button in the Column Data Format section.
NOTE:
You will need to do this for each column where the data contains leading zeros.
(ICNO, PHONE NO and HP PHONE)
Click Finish
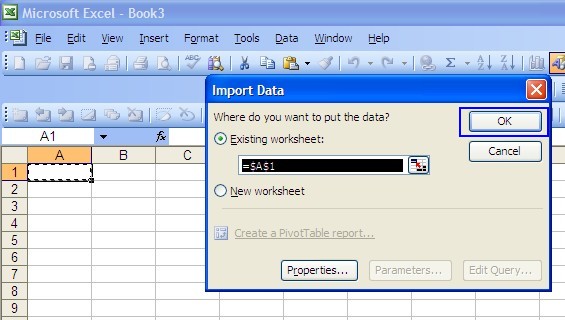
6. Click Ok. The leading zeros will still be there in the new worksheet with the imported data.
Is there any way if we would like to attached a scan documents for example a letter to a parent on a student profile , so that the parent can download or view it on line from the child profile it self?
Pls refer to the following guideline to enable user to attach a scan documents or letter to a parent on a student profile, so that the parent can download or view it on line from the child profile itself.
Step 1: Upload Document:
To upload a document or letter, go to School Mgmt ~> Document Sharing ~> Upload
Step 2: Copy document link:
To copy link of uploaded document in the document sharing function, go to School Mgmt ~> Document Sharing ~> Download
–Go to the link of the File you wish to send to “group” right click of the mouse and click “Copy Shortcut” to copy the link.
Step 3: Create resource center:
Once you’ve copy links of the files, now you can go to option School Mgmt ~>Resources Center ~> Create.
Download Files:
Step 1: Login
Login to EDMS system, and select “Internet Resource Center” at Workplace
Step 2:
Click the links & system will pop up a window for user to open or save the files into guardian pc.
How to remove wrong relationship links between student and guardian?
On this FAQ will show the step on how to remove linked student under guardian.
Step 1.
Check the student under guardian which already linked on Basic Module -> Enquiry -> Student Under Guardian
Step 2.
Delete wrong student under go to Basic Module -> Student Mgmt -> Guardian Info -> Link Student Under Guardian -> Delete
To verify correct guardian profile, please follow the step 1) Enquiry->Student Under Guardian
How to Enable “Gender” Sorting Shown on the Class Teacher & Student Name List Report?
To Enable “Gender” Sorting Shown on the Class Teacher & Student Name List Report, Followings are the illustrated steps:-
Step 1: Provide “Gender” information Via Student Information Printing/Enquiry
Go to Basic Module ~ > General Setting, Tick “Gender” checkbox under Student Information to be Included During Enquiry/Printing
Step 2: Retrieve Class Teacher & Student Name List from Class Information Inquiry
Go to Enquiry ~ > Class Information ~ > Class Teacher & Student, Click the Gender link to sort the gender in “M” “F”. Then, click single/multiple column checkbox to print the student class list sorted by gender
How to convert unreadable chinese characters in excel (.xls) format?
There is some SMS’s User reported that when the data exported with Chinese character from SMS and directly export into .xls file, the Chinese character especially student name in other language will display as unreadable character. This is because xls file format doesn’t provide decoding chinese tools to display chinese character correctly.
To resolve this issue, user is required to convert the exported data from excel spreadsheet format into notepad where the UTF-8 encoding from notepad can be set for displaying chinese character correctly.
To do it, please follow the steps as guided below on how to convert unreadable chinese characters at spreadsheet format.
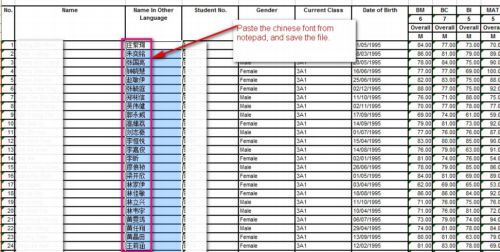
Step 1 – Open the xls files and copy the chinese fonts
To begin with, user is require to copy the chinese font in exported data at xls format.
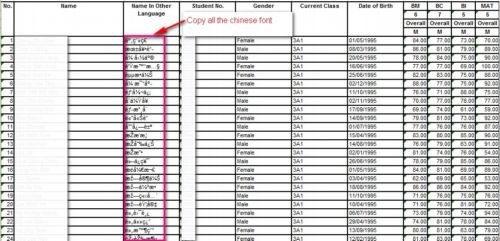
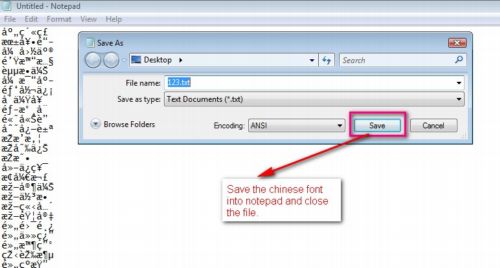
Step 2 – Open the notepad, and paste the chinese font onto the notepad.
To begin with, please open Notepad first and go to paste the chinese font onto it, after that save the notepad at your pc desktop. Pls close the notepad program after you have successfully save the file.
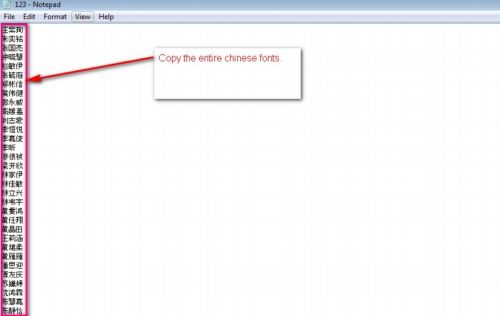
Step 3 – Open the save notepad again and copy the converted Chinese character font.
Once you have open the notepad again, you can view the unreadable chinese fonts have been converted successfully. Copy all the chinese font from notepad.
Step 4 – Open the original xls files and paste the chinese font from notepad.
Go back to your original exported xls file and paste the chinese font from notepad and save the xls file.
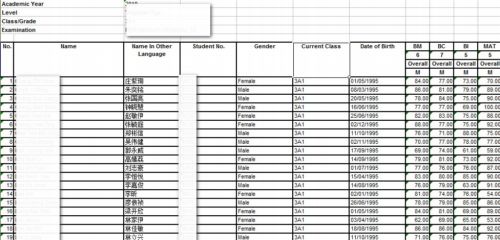
Once you have save the files, Ms excel will prompt screen as following:- click “Yes” to overwrite it.

Example screen after chinese character is converted.
How to install ????(?) Chinese font type into PCs and ready to use for printing school leaving cert & testimonial
For some computers which doesn’t recognize Chinese character font type name ????? at their current running window platform, please follow steps as below:-
(i) Please download Chinese font type name ????? from website http://www.sj00.com/soft/19160.htm provided
(ii) System prompt message as following:-, Save “JDK.rar” zip font package on your pc desktop
(iii) Once file have successfully downloaded, Extract the files and copy paste the file into C:\WINDOWS\Fonts:
How to convert CSV file to Excel spreadsheet format?
User reported that when the data exported with chinese character from SMS and save directly into csv file, the chinese character will display as unreadable character. This is because csv file must be saved with UTF-8 encoding in order to display chinese character correctly.
To resolve this issue, user is required to convert the exported data into excel spreadsheet format where the UTF-8 encoding can be set for displaying chinese character correctly
To do it, please follow the steps as guided below on how to convert csv file to spreadsheet format.
Step 1 – Save the exported data directly to CSV file
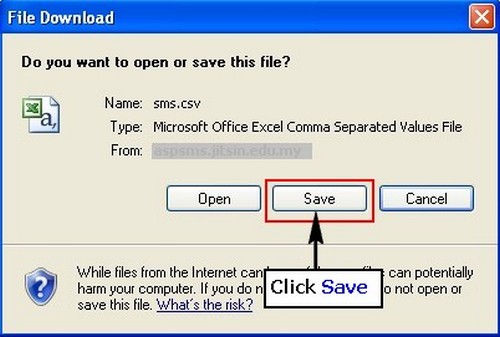
To begin with, user is required to export data from SMS via Exports SMS Profile to Excel Format option. A pop up window will be displayed as shown in sample screen below and please click on Save button and proceed to next screen.
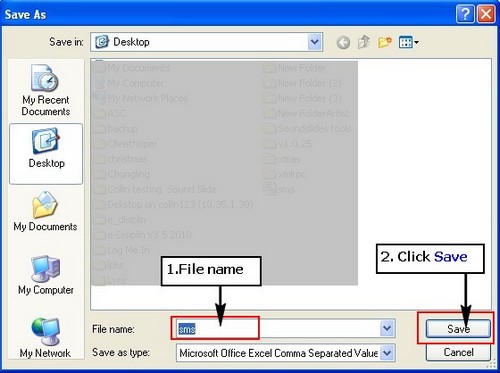
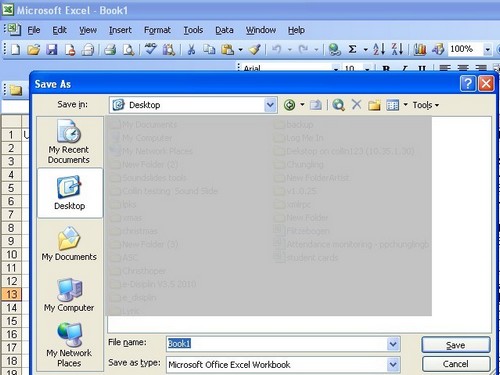
The following screen is displayed for user to save the file to its desired location. The defaulted file name is “sms”. Click on save button to save the file successfully and proceed to next step.
Step 2: Convert CSV to Excel
To begin with, please open Microsoft Office Excel (version 2003 & above) first and go to menu bar Data-> Import External Data-> Import Data. 
Select the directory of the file and click “Open” button once the file (eg “sms”) is located and proceed to next screen.
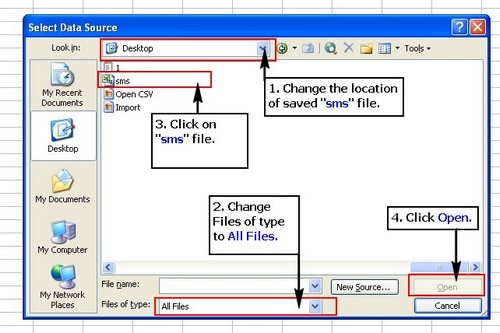
Please make sure that the “File origin” must be in 65001 : Unicode (UTF-8) only. Click on the next button to continue to Step 2 Text Import Wizard.

Please click on the checkbox “comma” in order to tabulate the fields and click “Next ” button to proceed to Step 3 Text Import Wizard.

Please make sure to change “Column Data Format” as “Text” on “ICNO“, “PHONE NO” and “HP PHONE” fields in order to display correct information. Click ”Finish” button and proceed to next screen.

Click ok for data import to Excel

Example Screen after cobvert CSV to XML Format.

User may save the Excel file.
How to graduate Form Five or Upper Six students by class or level?
In view of not many of the Form Five students continuing to Lower Six, we would recommend user to graduate all the Form Five students instead of roll over to Lower Six. This is to ensure that for students not continuing to Lower Six with status updated as “Graduate” in correct academic year.
As for those students continue to Lower Six, please go to Basic –> Student Mgmt –> Personal Record –> Reinstate option to re-activate the students to Lower Six level.
All Form Five or Upper Six students can be graduated by class or level via Class Streaming option or Start Year Auto Enrollment option, depending on the option selected to roll over students from previous to new academic year as per set up in e-Report Card –>General Setting .
Before graduating the said students, please ensure that the Opening Placement for Upper Six and Form Five level are set NOT to process “Class Streaming” or “Start Year Auto Enrolment” for graduation classess.
How to export SMS student data from iSchool SMS and import into SMM4.0
SMS Data Export to SMM function has been enhanced to allow exported SMS student data to be imported into both SMM3.02 and SMM4.0 file format. This will reduce duplicated data entry for student basic information.
Followings are the illustrated steps on how to export SMS student data from iSchool SMS and import into SMM4.0.
Step 1 – Export SMS Data to SMM4.0 File Format
SMS data can be exported to SMM4.0 file format via 2 modules ie either SMS Basic or SMMWeb. If your school has signed up both modules, we would recommend you to INPUT student information and EXPORT SMS data via SMMWEB since this module captures all the student information as required in SMM3.02.
i) To export SMS data to SMM from SMS Basic Module, please go to School Management –> Data Export To SMM option.
Or
ii) To export SMS data to SMM from SMMWEB Module, please go to Maklumat Murid –> Data Export ke SMM option.
Step 2 – Import SMS Data to SMM4.0
Step 2.1: On the SMM programe, go to menubar Import/Export->Sekolah->Import.
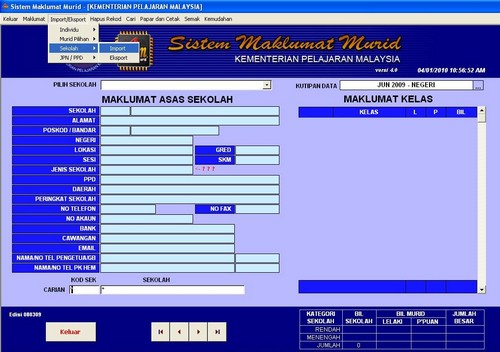
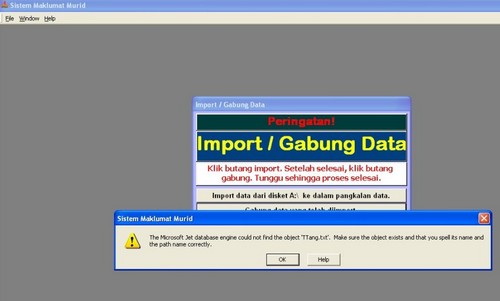
Step 2.2: Insert floppy disk on A drive. and click on the “Import data dari disket A:\ ke dalam pengkalan data” button and click on “OK” to proceed.
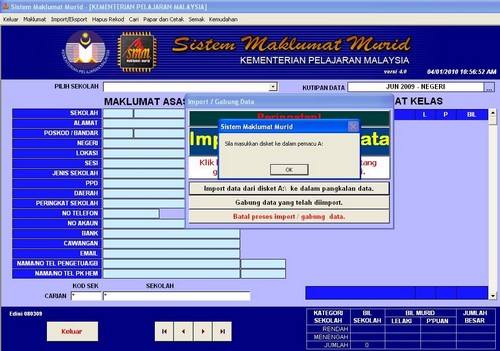
Step 2.3: Please ignore the warning messages and click “OK” button to continue. Warning messages alert user on the incomplete data being imported into SMM4.0.
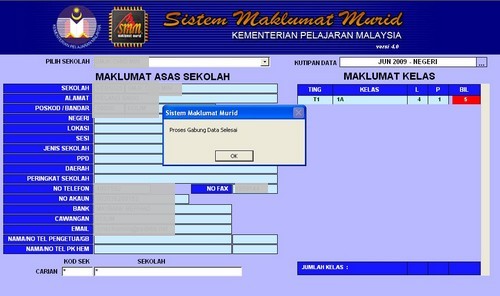
Step 2.4: Please ensure the SMS data are successfully imported into SMM4.0 with message ” Proses Gabung Data Selesai” prompted.
Step 3 – Edit Student information in SMM4.0
User is required to update additional student’s data in SMM 4.0 which are not available in SMS before submitting to MOE.
