Archive for the ‘Exam’ Category
How to use Student’s attendance as to be as subject mark on the report card?
On the Basic Module
Step 1: Call the EDMS support to add in the ‘new subject’ for attendance count to be a subject mark.
Step 2:
Offer the subject for example ‘Attendance‘.
Click on (Curirculum Mgmt -> Subjects Offered -> Create & Update)
Step 3:
Create the timetable for the subject (Timetable Mgmt -> Timetable By Class)
or
i) Create staff timetable slot. (Timetable Mgmt->Staff Timetable Slot-> Staff-Subject Setup) and
ii) Assign the subject and class to staff for ‘Attendance’. (Staff Timetable Slot -> Create)
Step 4:
Enroll the subject (Timetable Mgmt-> Enrolment->By Class)
Step 5:
Select the Subject to E-report card Student Attendance Marks Integration (School Mgmt -> General Setting)
On E-report card.
Step 1: Setup the subject (Attendance) with the examination marks parameter
(Parameter Setup-> Subject Exam Setting Normal Exam)
Step 2: Input all the subject marks except ‘Attendance’ subject.
Exam Mgmt ~> Input Marks ~> By Subject & Class
Step 3: Produce the Class/Level Ranking.
Step 4. To adjust the attendance count go to (Exam Mgmt -> Class Result Adjustment).
i) Tick the (Attendance) Checkbox and Submit.
ii) The students name with other subject marks will get the attendance count. You may input the attendance count and click submit to save the record.
Step 5. To import the attendance count as marks, go to (Exam Mgmt-> Marks Intergration -> Student Attendance).
Choose the examination name, level, class and tick overwrite status to Yes.
The name list of class and the attendance marks will show, tick to import the attendance marks as subject marks and click submit to save record
Step 6. Produce Class/Level Ranking.
After done produce class ranking, you can proceed view or print the report card.
What should I do if I want to update the grade table for the existing grading system?
If the existing grading system had been used in grading any one of the school exams, you should NEVER update the existing grading system. The reasons behind are :
1. It will mislead user since the exam result graded still reflect the original grading system and it will not tally with the modified grading system, Eg original grading system with marks 81 & above is considered as A but after grading system modification, 85 & above is considered as A only.
2. The Average Grade for GPK (Grade Purata Keseluruhan) analysis fails to report correctly (ie 0% on Pass or Fail) since the graded exam result for analysis still reflects the original grading system which is no longer tally with current modified grading system.
3. The Average Grade of GPS (Grade Purata Sekolah) analysis fails to report correctly since the graded exam result for analysis still reflects the original grading system which is no longer tally with current modified grading system.
As such, user should CREATE new grading system whenever new Grading System is introduced. All the Grade table related to new Grading System must be defined in the system first and thereafter assigned to Level Offered, Subject Offered and Subject Exam Setting functions before processing class / level ranking.
If the modification of grading table after produced exam ranking is still required, user must perform the steps as illustrated below in order to reflect the latest updated grading system before re-processing class/level ranking.
1. Update the Level Offered function by clicking “Process” button at Basic ~ > Curriculum Mgmt Module
2. Update the Subject Offered function by clicking “Process” button at Basic ~ > Curriculum Mgmt Module
3. Update the Subject Exam Setting ~ > Normal Exam at E – Report Card Module ~ > Parameter. If your exam has setup for the subject where the marks are to be input by paper, please update the Paper Exam Setting ~ > Normal Exam at E – Report Card Module ~ > Parameter as well.
4. Go to Exam Mgmt ~> Mark Input ~ > by class & Subject, re – update the each subject marks accordingly.
5. Finally, go to Exam Mgmt ~ > Produce class/level ranking process, to automatically grade the exam marks and sort the position of the students in the class as well as in the level.
How to export SMS exam data from iSchool SMS and import into SAPT6?
SAP function has been enhanced to allow exported Exam result data cum with student performance remarks to be imported into SAPT6 version 1.0 only.
To maintain a complete pre-essential data in iSchool SMS before export into SAPT6
Before exporting, iSchool SMS users must ensure that all the exam essential data must be maintained completely in iSchool SMS in order to fulfill SAPT6 import fields requirement. Followings are the required data to be exported from iSchool SMS:
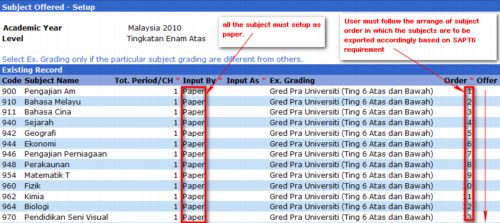
a) Subject offered must setup as Paper where it mean that user will need to setup the total exam mark which gathered by paper input. it is to complementary with SAPT6 to using the total or final exam mark for the subject will be based on the input of the subject’s exam paper(s).
b) Subject Ordered where use the “Order” field to arrange the order in which the subjects are to be exported accordingly. for example the Subject “PA” will always be 1st order follow by “BM” and etc. Please go to SMS Basic ~> Curriculum Mgmt ~> Subject Offered with the sample screen as below:
Step 1 – Identify the SMS exam type with SAPT6 exam type
Please ensure SAP Exam Code is match to your school exam type where it’s use to identify which exam type in the SMS to be import into SAPT6. Please go to Parameter Setup ~ > Exam Code & Type ~ > Edit for details.
Step 2 – Export SMS Exam Data to SAPT6 File Format
SMS Exam data can be exported to SAPT6 file format via SMS E – Report Card Module. To export SMS exam data to SAPT6, Please go to SAP – SAP Data Export Option. Please note that, SAPT6 only allow user to import Lower Form 6 & Upper Form 6 exam data.
Step 3 – Import SMS Exam Data to SAPT6
Step 3.1: On the SAPT6 program, go to menubar ~ > Utiliti ~ > Utiliti
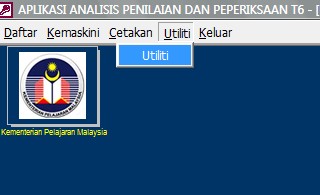
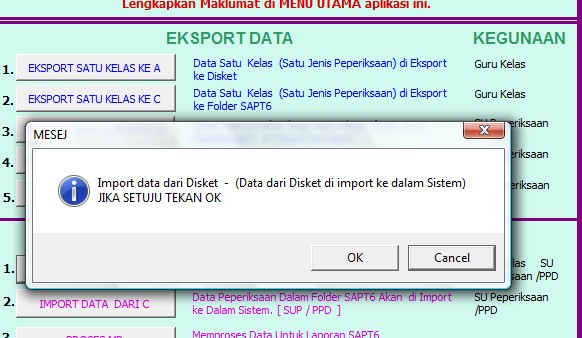
Step 3.2: Insert floppy disk on A drive. and click on the “Import data dari A (ZIP FILE)” button and click on “OK” to proceed.
OR
Step 3.2: Extract out the Zip file (DATASAP) content from your SMS exam data export and copy & paste the 5 different files to your PC’s SAPT6 program directory which normally installed at C:\SAPT6.
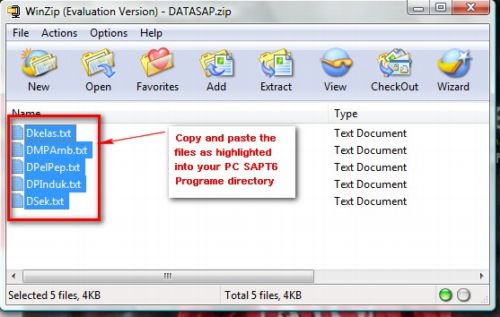
Then, go to utiliti page, click on the “Import data dari C” button and click on “OK” to proceed.
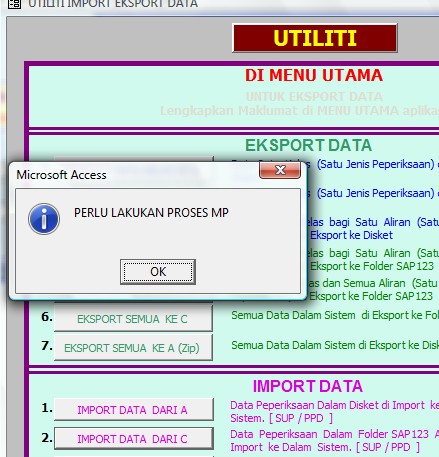
Step 3.3: Please ignore the warning messages and click ”OK” button to continue. A “PERLU LAKUKAN PROCESS MP” messages alert user to run the process to compute and grade the newly exam marks imported of the students in the class as well as in the level.
Once the steps as above is completed, repeated the same steps for following level until all the Upper & Lower form 6 is completed imported into SAPT6.
Step 4 – Edit Subject marks information in SAPT6
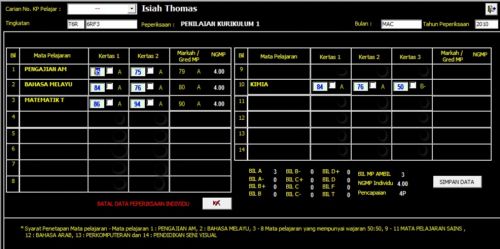
User is required to update or remove any subjects student’s exam data in SAPT6 which are not required before submitting to MOE.
How to export SMS exam data from iSchool SMS and import into SAP123?
SAP function has been enhanced to allow exported Exam result data cum with student performance remarks to be imported into SAP123 version 4.0 only. The purpose of this features introduce will helps school users eliminating their time to do duplicated data entry both in iSchool SMS and SAP exam data entry.
Step 1 – Identify the SMS exam type with SAP123 exam type
Please ensure SAP Exam Code is match to your school exam type where it’s use to identify which exam type in the SMS to be import into SAP123. Please go to Parameter Setup ~ > Exam Code & Type ~ > Edit for details.
Step 2 – Export SMS Exam Data to SAP123 File Format
SMS Exam data can be exported to SAP123 file format via SMS E – Report Card Module. To export SMS exam data to SAP123, Please go to SAP – SAP Data Export Option. Please note that, SAP123 only allow for user to import Form 1, 2 or 3 exam data.
Step 3 – Import SMS Exam Data to SAP123
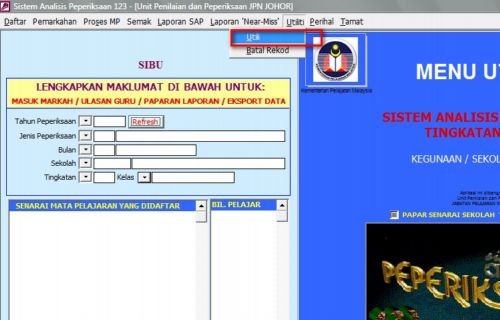
Step 3.1: On the SAP123 programe, go to menubar ~ > Utiliti ~ > Utiliti
Step 3.2: Insert floppy disk on A drive. and click on the “Import data dari A (ZIP FILE)” button and click on “OK” to proceed.
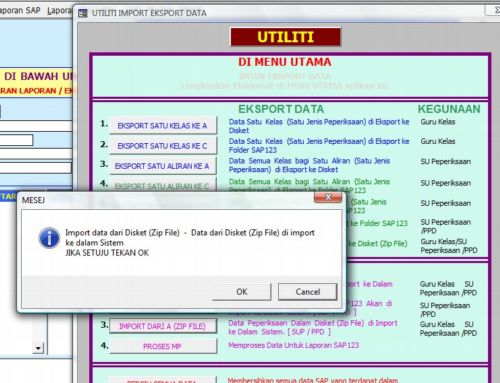
OR
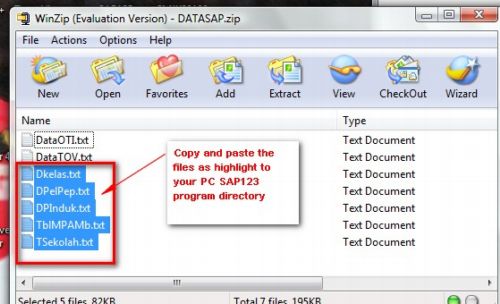
Step 3.2: Extract out the Zip file (DATASAP) content from your SMS exam data export and copy & paste the 5 different files to your PC’s SAP123 program directory which normally installed at C:\SAP123.
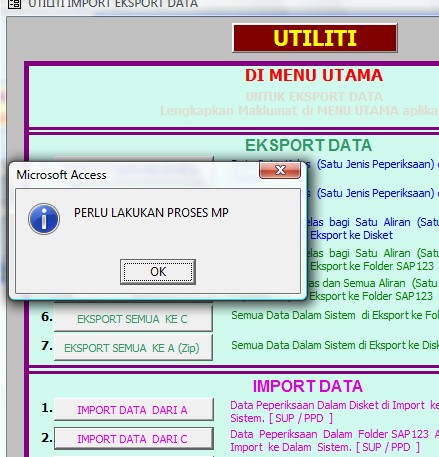
Then, go to utiliti page, click on the “Import data dari C” button and click on “OK” to proceed.
Step 3.3: Please ignore the warning messages and click ”OK” button to continue. A “PERLU LAKUKAN PROCESS MP” messages alert user to run the process to compute and grade the newly exam marks imported of the students in the class as well as in the level.
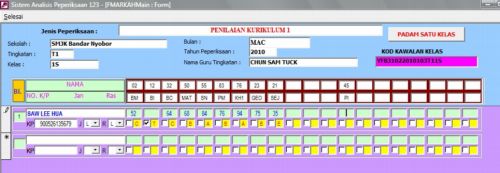
Once the steps as above is completed, repeated the same steps for following level until all the form 1, 2 & 3 is completed imported into SAP123.
Step 4 – Edit Subject marks information in SAP123
User is required to update or remove any subjects student’s exam data in SAP123 which are not required before submitting to MOE.
How to use Head Count and Post Mortem function as monitoring tool in achieving targets as set for students in current academic year?
Headcount is prepared to set target for students individually as well as a group in a class and form/level to achieve in academic performance. After each exam, it is the duty of subject teachers to analyse exam results and study if the performance has achieved the targets as set. Normally, for Mid-Year exam, targets were set in OTI1 while for Final exam, it is OTI2. ETR is the target for the Public exam.
If targets are not achieved, teachers must carry out post-mortem and take action to assist weak students to achieve the targets in the next exam. The whole exercise is for the school to achieve targets set for the Public Exam.
Subject teachers have to set target for their students to achieve, based on the examination results. For a start, the Take-off Values (TOV) are taken for setting the Expected Target Result (ETR) to achieve. Normally, final year exam results of the previous academic year will be used as TOV for Form 2, 3 and 5 whereas mid-year exam results of current academic year will be used as TOV for Form 1 and 4. This is done for all subjects, normally only subjects offered in the Public Exam.
ETR can be set as a standard percentage (eg 5% or 3 %) or standard marks (5 marks) or set by individual student by subject teacher for the final computation of headcount. The subject analysis should be carried out on ETR data to decide on the number of A, B, C, D and E, from which percentage of each grade is determined. If the percentage of Passes is lower than the Public exam best 3 year results, then the ETR data is not valid. Hence, adjustment needs to be carried out. Teachers have to calculate the number of students needed to pass in the ETR so that the percentage computed is higher than the Public exam results. After obtaining the figure, they have to adjust the number of students from fail grade to pass to match with the number computed for passing.
Please follow the steps guided below on how to use Head Count and Post Mortem function as monitoring tool in achieving targets as set for students in current academic year. Please take note that only SMS user with role assigned as “E-Report card (Exam Committee) is able to access the Headcount function.
Step 1 – To set up Head Count Parameter
Before start using head count and post mortem function, user is required to set up the basic instruction to process transaction data in order to allow the function to work properly and correctly. This setting is done for every academic year and is editable to be in line with school operation. To do it, please click on the link Head Count and Post Mortem ~>General Setting.
Step 2 – To import TOV and ETR
This process will import TOV value as well as compute ETR value for the selected levels. User is able to select multiple levels for processing at the same time. To do it, please click on the link Head Count and Post Mortem ~>Import TOV and ETR.
Step 3 – To adjust computed ETR
Subject teacher is allowed to adjust the computed ETR by class. To do it, please click on the link Head Count and Post Mortem -> ETR Adjustment.
Step 4 – To process OTI
This process will evenly distribute the total targeted marks to achieve (ETR – TOV) in order to compute ETR for each selected school exam. Eg, Student=A, Subject=BM, TOV=69marks, ETR=75 marks, Total Targeted marks to achieve = 6 marks, Mid yr Exam(OTI1) & Final Yr Exam (OTI2) are chosen for analysis. As such, the ETR for OTI1 = 72 marks and OTI2 = 75 marks. To do it, please click on the link Head Count and Post Mortem ~> OTI Processing.
Step 5 – Print Reports
A) HC1 – Subject Target Listing Report (Target Mata Pelajaran Mengikut Panitia)
To print Student Subject Target Listing Report, go to Head Count and Post Mortem -> Report -> Subject -> Target Listing Report.
B) HC2 – Student Subject Target Listing Report (Target Mata Pelajaran Mengikut Panitia Dan Setiap Murid)
To print Student Subject Target Listing Report, please click on the link Head Count and Post Mortem ~> Report ~> Student Subject Target Listing Report.
C) HC3 – Exam Achievement and Project Listing (Pencapaian Ujian and Pengunjuran)
To compare the actual exam result achievement with the projected / targeted result for a particular subject, go to Head Count and Post Mortem -> Report -> Exam Achievement and Projection Listing.
D) HC4 – Student Overall Subject Target Listing Report (Sasaran Murid Mengikut Mata Pelajaran)
To print Student Overall Subject Target Listing Report, please click on the link Head Count and Post Mortem ~> Report ~> Student Subject Target Listing Report.
E) HC5 – Average Grade Determination Listing (Penentuan Gred Purata Sekolah)
To print Average Grade for all subjects, go to Head Count and Post Mortem -> Report -> Average Grade Determination Listing.
F) HC6 – Excellent Student Target Listing (Target Murid Cermelang)
User is able to inquire the targeted list of students that will obtain targeted “A”s as specified, for a particular level. To generate the student listing by targeted number of “A”s, go to Head Count and Post Mortem -> Report -> Excellent Student Target Listing.
G) PM1 – Post Mortem Analysis By Subject (Analisa Post-Mortem / Klinikal Pelajaran)
To generate the student post mortem analysis report by subject, go to Head Count and Post Mortem -> Report -> Post Mortem Analysis by Subject.
H) PM2 – Comparative Post Mortem Result Analysis (Analisa Perbandingan dan Post Mortem Keputusan)
To generate the comparative result analysis, go to Head Count and Post Mortem -> Report -> Comparative Post Mortem Result Analysis.
How to use Skill and Assessment function to generate the assessment report for students?
Skill and Assessment as an added feature to Exam & e-Report Card Module for measuring the competency of students in achieving pre-set skills / assessment criteria as part of learning process besides academic performance. The skills and assessment criteria can also be measured for a specific project assigned or examination. The Assessment Report can be printed and distributed to students.
Please follow the steps guided below on how to use Skill and Assessment function to generate the assessment report for students.
Step 1 – Create Skill / Assessment as assessment criteria
This is to pre-defined assessment criteria for skill and assessment. To create Skill/ Assessment, please click on the link Parameter Setup ~> Additional Features ~> Skill/ Assessment ~> Create.
Step 2 – To offer Assessment
To offer the level of students to be assessed, please click on the link Parameter Setup ~> Additional Features ~> Assessment offer.
Step 3 – To offer Skill / Assessment by Subject
To offer skill/assessment by subject, please click on the link Parameter Setup ~> Additional Features ~> Skill/Assessment offer by subject.
Step 4 – Input Skill / Assessment by Grade / Marks
To input Skill/Assessment marks / grade, please click on the link Exam Mgmt ~> Input Skill/Assessment ~> By Slot/Set.
Step 5 – Print Assessment Result
To print Assessment Result, please click on the link Exam Mgmt ~> Additional Features ~> Assessment Result.
Other Reports
1. Skill Report
To print Skill Result, please click on the link Exam Mgmt ~> Additional Features ~> Skill Report.


