Archive for March, 2008
Google Docs adds Colored Folders
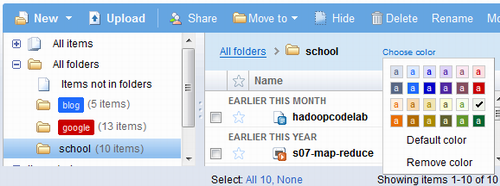
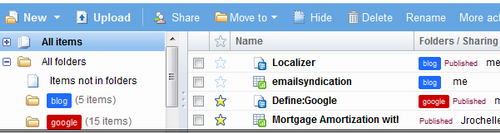
Google Docs lets you select a color for each of your folders, a feature that has been previously available in Gmail. The color will be used to represent a folder in the sidebar and in the document list, so you can easily spot related documents.
Another new feature, this time available only for documents and presentations, empowers you to change the owner of a document. Unlike simple collaborators, the owner of a document can delete it and can restrict the access to a document for some collaborators. This page explains the difference between viewers, collaborators and owner. To become a collaborator and transfer the ownership of some of your documents, select them from Google Docs homepage and choose More actions > Changer Owner.
Judging from the source code, Google Docs will include an option to add collaborators with limited rights – they won’t be able to download a document, change its settings, share it or publish it. Creating user groups with custom permissions could be an even better idea.
Google Docs Gets a Menu
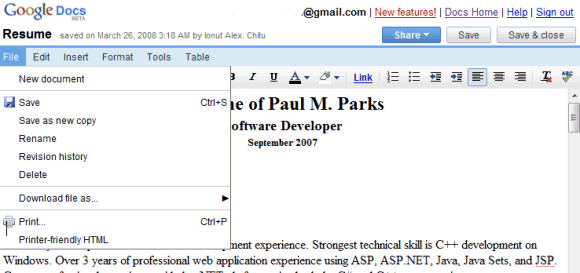
After updating the toolbar, Google Docs replaced the tabbed interface with a traditional menu. The File menu looks cleaner and integrates the revision history, the Edit includes some of the options that are missing from the toolbar (cut/copy/paste) and also the HTML code editor. It’s amazing to see that Find & Replace is still in alpha and doesn’t work as advertised. The Insert menu has the same features as the homonymous tab, Format replaces the Styles dropdown, while Tools lets you select the document’s language, check the spelling and read stats about the document. The Table menu was previously available as a contextual menu for tables and there’s a new Share drop-down that integrates the options to share a page, publish it on the web and preview it.
Google Docs includes all the menus from Microsoft Word 2003, except for View, Window and Help, but there’s enough room to add more menus in the future. The team’s blog explains the changes by invoking a user study, but the truth is that most people are used to Microsoft Office’s classic interface:
A while ago, our Docs User Research team worked on a “card-sort” study in which we disconnected all features in the application from the places we had put them in the UI, and asked some people what the labels and icons meant to them, and how they would group the concepts they represented. One of the things we found was that names such as File, Edit, Format, and Tools resonated as “where you might look” for certain editing features. Check spelling? Seems to fit in a “Tools” group to many people. Find and replace? People generally look for that in an “Edit” group.
These updates are only for the word processing application, as Google Spreadsheets and Presently continue to use the old interface. Having an unified interface and a set of features that work consistently in all the three applications should be a priority for Google.Via http://googlesystem.blogspot.com/
Traffic Stats for Your Google Documents
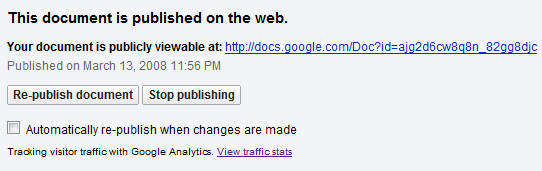
Google Docs has a new option to track published documents using Google Analytics. You need to go to the Settings page, enable the tracking option and add a Google Analytics profile ID. It’s not clear whether you need to create a new profile or use an existing one, but both options might work.

After publishing a document, you’ll see a small message: “Tracking visitor traffic with Google Analytics.”
How To Avoid Sharing Older Versions of Google Docs Documents
If you create a new document with Google Docs and edit it for a while, different snapshots of your document will be saved into the revision history for this document. Perhaps at some point you consider your document to be in a state where you want to share it with someone else. Hitting the Share tab and inviting a collaborator, the collaborator will be able to see your latest version of the document.
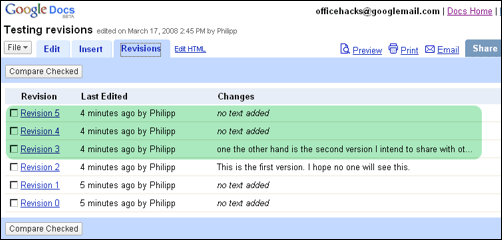
However, note that your collaborator will not merely see the latest version of your text; they will also be able to switch to the Revisions tab of the editor and check older versions of your text before you shared it. Potentially, some of the older snapshots may contain things like comments you then considered to be inappropriate for the document, or accidentally pasted private text. This includes versions of the text which you did not actively save, as Google Docs features auto-saving.
In the screenshot below, I shared a document with the sample user officehacks@gmail.com, marking all the versions of the text since the time of sharing in green. As you can see, the older versions outside the green area are still existing, and can be viewed in full.
To avoid this behavior of Google Docs – in case you want to avoid it (as there may be cases where you are happy for the other person to utilize the full revision history) –, make a copy of the original document before sharing it. You can then give the old document a name like “Backup of Foobarâ€, and then give the new document the original name of the old one, like “Foobar.†(By doing so, you will be losing accessing the old revisions from within the new document, though you can still find them in the backup should you need to.) Sharing just the new copy with your collaborator ensures the revision history will be “cleared.â€
Google Docs to Add a Menu and Print Layout
The new toolbar from Google Docs is just a part of a bigger redesign. Apparently, Google Docs will replace the tabs with a traditional menu and will switch to a “print layout”, the default view in Microsoft Word. It’s not clear whether Google Docs will also add pagination, but I don’t see the point of adding a print layout without actually showing pages.
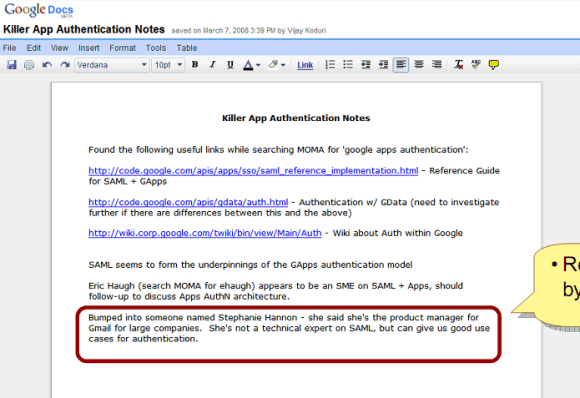
The slightly-edited screenshot is from a presentation that shows some of the tools used by Google employees, who have access to not-yet-released versions of Google’s products. Philipp Lenssen describes some of Google’s internal tools, while Brian Ussery has more details about the presentation.
Sync with Microsoft Outlook calendar
One of the most popular requests for Google Calendar was synchronization with mobile devices and Outlook. After launching a sync tool for Blackberries, Google Calendar now offers a small utility for synchronizing events with Outlook.
By default the synchronization is bi-directional, but you can change this when you install the utility or from the options dialog. The only significant drawback is that you can only synchronize your main Google Calendar, but a future update should remove this limitation.
Google Calendar Sync: Getting Started
Google Calendar Sync allows you to sync events between Google Calendar and Microsoft Outlook Calendar. You’ll be able to determine the direction of information flow, as well as the sync frequency. Staying on top of your Google Calendar and Microsoft Outlook Calendar events has never been easier!
Keep in mind that it’s not possible to sync events on secondary calendars at this time. Google Calendar Sync will only sync events from your primary Google Calendar and your default Microsoft Outlook calendar.
Get started
To begin syncing, follow the steps below:
- To download Google Calendar Sync, visit http://dl.google.com/googlecalendarsync/GoogleCalendarSync_Installer.exe
- Once a dialog box appears, click “Save File.” The download should open automatically. If it doesn’t, manually open the download from your browser’s download window.
- Click “OK” to confirm that you’re aware this is an executable file.
- Read through the Google Calendar Sync Terms of Service, and click “I Agree.”
- Continue to follow through the Installation Options and click “Install” to finish the set-up process.
Once Google Calendar Sync is installed on your computer, the Google Calendar Sync Settings window will appear:

In the Settings window, enter your email address and password and select the Sync Option you prefer. For more information on each Sync Option, please visit Google Calendar Sync: Options
You’ll also be able to set the time interval for syncing to occur. Please keep in mind that 10 minutes is the minimum time interval allowed.
After the initial set-up, you can access the Google Calendar Sync Settings window again by double-clicking on the calendar icon in your Windows System Tray.
Icon Status
To access the Google Calendar Sync Settings window, just right-click on the calendar icon in your Windows System Tray and select “Options”.
When your events are actively syncing between Google Calendar and Microsoft Outlook Calendar, you’ll see arrows in the Google Calendar Sync icon:

When events aren’t actively syncing, your calendar icon will look like this:

Adding Page Numbers to Google Documents
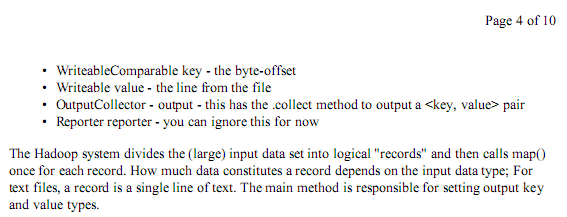
Google finally realized that the headers and footers from Google Docs have almost no real use, as you can’t add dynamic information like page numbers or the current date. Until Google adds these options in the interface, you can edit the document’s HTML code to use them. To add a header that displays “Page (current page number) of (total number of pages)” , click on “Edit HTML” and add this code at the beginning of the document:
<div style=”text-align: right;” class=”google_header”>Page <span class=”google_pagenumber”>1</span> of <span class=”google_pagecount”>1</span></div>
When you save the document as a PDF, the header will look like this:
For footers, you should add this at the bottom of the document, in HTML view:
<div style=”text-align: right;” class=”google_footer” id=”google_footer”>Page <span class=”google_pagenumber”>1</span> of <span class=”google_pagecount”>1</span></div>
It’s a good idea to go back to the rich text editor quickly if you don’t want to see the horrible code generated by Google Docs. The “dynamic” headers and footers are visible only if you export the document to PDF, for example to print it.
