Viewing and Adding to a Wiki
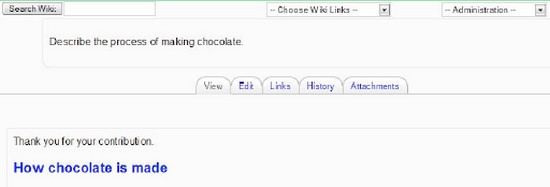
If you did not specify an initial page from text pages you uploaded, then you may want to create your own initial page by using the editing box displayed. Note the tabs and pull-down menus that appear on the wiki page. “View”, “Edit”, “Links”, “History”, and “Attachments (only if you set it to allow binary files). Dependent on the permissions that you set up for this wiki, students will have similar options when they interact with your wiki:

- Search Wiki — Enter a keyword or phrase and click [Enter] key to search all of this wiki. It will yield a listing of all the wiki pages (as links) that contain the search term. When you click on the page link it will display the wiki page, with the search terms highlighted.
- Choose Wiki Links — This drop-down menu lists lots of choices to view or implement associated actions.
- Site map — show an outline form of the wiki’s structure listing each separate page of your wiki.
- Page index — provides a list of several “views” and actions that may be associated with your wiki, including a place to download attachments (that were previously uploaded), Upload attachments, Export your wiki (so you can duplicated it in another course or wiki site), as well as link to any given page that you have included in the wiki, itself.
- Newest pages — shows most recently added pages to the wiki
- Most visited pages — self-explanatory
- Most often changed pages
- Updated pages
- Orphaned pages — pages that have lost their links from other pages due to changes to the referring pages
- Wanted pages —pages that people have entered “CamelCase” words for, but no one has created a page to link to from that word.
- Export pages — another way to access the export utility
- File Download — another way to access the attachments download screen
- Administration — As a teacher you will see four options (Students will see the options that you checked during setup, if they are allowed to add to the wiki pages)
- Set page flags: Change the type or behaviors of pages in your wiki (TXT, BIN, OFF, HTM, RO, WR) Each page will be listed with its current attributes checked.
- Remove pages: If you have unreferenced pages (not linked), you will see them listed here where you can choose to remove pages you select.
- Strip pages: Allows you to purge all old pages of your wiki, keeping only the newest versions.
- Revert mass changes: If you have a particularly troublesome contributor that “vandalizes” or makes a mess of lots of pages in your wiki, you can delete all page changes made by entering their name in the author field or by other search string.
As with other activities in Moodle, you can change the basic settings for your wiki by logging in as the teacher and clicking on the button displayed as Update this Wiki.
CamelCase — CamelCase or WikiWords is the name given to text that starts with a capital letter and then includes another capital letter in the middle of the word. On a wiki page, if you type a WikiWord then save your entry, the view version of the wiki page will now show the word with a ? at the end of the word. This is a link, that if clicked will start a new page in your wiki. Anyone with permission to edit your wiki, will also be able to edit the additional pages created within the wiki.