Glossary
Creating a Glossary
- Turn editing on in your course.
- Choose “Glossary” from the activity dropdown menu in the topic or course section of your choice. A preferences page will appear.

- Name: Title of the glossary
- Description: Describe the purpose of the glossary, provide instructions or background information, links, etc.
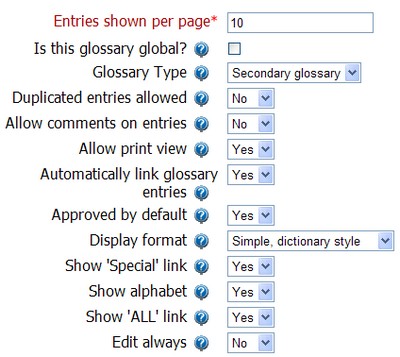
- Entries shown per page: The glossary can be configured to restrict the number of entries shown per page. If you have a large number of automatically-linked entries you should set this number lower to prevent long loading times.
- Is this glossary global?: If you choose to make the glossary global, the entries are used to create automatic links throughout the whole site (and not just in the same course the glossary belongs to).
- Glossary Type: The glossary system allows you to export entries from any secondary glossary to a course’s main glossary. In order to do this, you should specify which glossary is the main one. Note: You can only have one main glossary per course and only teachers are allowed to update it.
- Duplicated entries allowed: You may want duplication if you use the glossary as test review or if students are submitting examples of a term.
- Allow comments on entries: A teacher can add comments any time.
- Allow print view: A teacher can view print view at any time.
- Automatically link glossary entries: Turning on the automatic link feature will allow the entry to be automatically linked, whenever the concept words and phrases appear throughout the rest of the same course. This includes forum postings, internal resources, week summaries and so on. If you do not want particular text to be linked (in a forum posting, say) then you should add <nolink> and </nolink> tags around the text.
- Approved by default: This setting allows the teacher to define what happens to new entries added by students. They can be automatically made available to everyone; otherwise the teacher will have to approve each one.
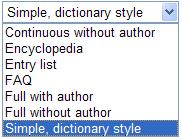
- Display format: This setting specifies the way that each entry will be shown within the glossary. The default formats are:

- Simple Dictionary: looks like a conventional dictionary with separate entries No authors are displayed and attachments are shown as links.
- Continuous: shows the entries one after other without any kind of separation but the editing icons
- Full with Author: a forum-like display format showing author’s data Attachments are shown as links.
- Full without Author: a forum-like display format that does not show author’s data Attachments are shown as links.
- Encyclopedia: like ‘Full with Author’ but attached images are shown inline
- FAQ: Useful for displaying lists of Frequently Asked Questions It automatically appends the words QUESTION and ANSWER in the concept and definition respectively.
- Show ‘Special’ link: Enable or disable browsing by special characters like @, #, etc.
- Show alphabet: Enable or disable browsing by alphabetic letters.
- Show ‘ALL’ link: Enable or disable browsing by all entries at once.
- Edit always: YES: students can always edit entries NO: students can edit only during the time period specified by the teacher
- Grades

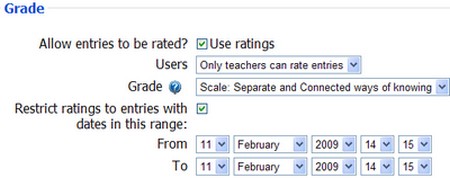
- Allow entries to be rated?: Will students’ entries be given a grade? By whom? How much will each entry be worth? Checking the Use Ratings box allows you to decide who will assign grades, as well as what kind of grade can be given.
- Restrict ratings to entries with dates in the range: Will there be a window for giving grades? Checking the box allows you to set dates for assigning grades to entries.
- Visible to students: You may hide a glossary from students
- Click Save Changes