Designing a Database
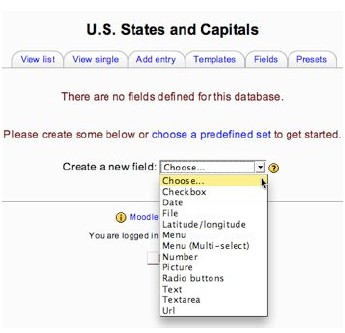
Once you have saved the preferences, a screen will appear indicating that now fields are defined for this database. You will also see five tabs appear that will help guide interaction with the database. If you have set the database activity for students to add entries, then they will see the first three tabs when they link to this activity. If you have allowed only teachers to add content, then students will see “View List” and “View Single” tabs only. The “Templates” tab and “Fields” tab are for your use in designing the look and interaction options for the database.
- First, create the fields for your database. Use the dropdown menu next to “Create a new field” to choose the type of field best suited to the content you expect for this field. Choices include: Checkbox, Date, File (e.g. a book report in a database of book titles), Latitude/Longitude (Google Maps, Google Earth), Menu (dropdown choices), Menu (Multi-select), Number, Picture, Radio buttons, Text (short answer), Textarea (paragraph), URL. The range of options for these database fields opens this activity module to a wide range of uses.

- Once you have your fields entered, click on the “Templates” tab to define how the information will appear to users browsing your database. It will display a default template for a single entry. The default templates utilize a table to organize the database information. (the dotted line boxes indicate an “invisible” border.) You can use this text editor to rearrange how the database entries will appear.
- At the left side of the text editing window is a list of “Available tags” for the database entries. Included in the list will be the names of the fields you created as well as a list of placeholders for icons or buttons that can appear on each page. The icon placeholder ##Edit##, for example, will actually appear as the pencil icon on the page when in view mode. One useful tag to add to your “single” template for many database activities is ##User## so that the person who submitted the entry will be displayed.
- You can determine the arrangement of information in your database in the single view mode and the list view mode or even add an additional template for another “view”. For example, you may want to only include some of the information on the database entry in the “list” view and include more fields on the “single” template. (To do this you would remove some fields from the list view template.
- When you click on the Templates tab you will see many more tabs appear, including a tab for the RSS template (if you have opted to include RSS feed information), and a CSS template (for those who know how to use CSS commands that will affect how entries and text will appear in all templates. (Ignore this if you don’t know how to do this.)
- Once you have your fields defined and your templates designed, you are ready to activate your database by clicking on [Save template].
- Click on the “Add entry” tab. This is, basically, what all who are allowed to add content to this database will see when they click “Add entry.” As a creator, you also will see a link to allow you to “Upload entries from a file.” (See “Uploading data to a database” section.) Otherwise, you may want to just add a few entries to your database activity, individually, so you can test how they appear in the list and single entry view modes.
- Click on the “View list” tab. You should see multiple entries in your database (if you have entered several), each separated by a thin line, and, if you didn’t delete them, you will see icons that allow you to edit the entry, view the entry in the “single” mode and/or delete the entry. (The icons you see for the entries will vary, dependent upon the preferences you set for the activity and the items you included on each entry when you set up the template).
- All users have some options when viewing the contents of the database. You can choose (for the list view) how many entries to include on a page. You can search for a keyword to help you find one or more database entries that include that term. You can sort by any field or by the date the entries were added, and you can sort in ascending or descending order.
Special Note: If you set up a database activity and add some entries, then change your mind about
preferences for the activity, it will not delete the entries already in the database, but it will also not
apply the new preferences to any pre-existing entries.