Introduction to Lessons
What Is a Lesson?
A lesson consists of a series of web pages. Usually, a lesson page contains some instructional material, and a jump question about the material the student just viewed. The jump question is used to test a student’s understanding of the material. Get it right, and you proceed to the next item. Get it wrong, and you’re either taken back to the instructional page, or you jump to a remedial page. But the jump question could also easily ask a student what he is interested in learning next, or who her favorite candidate is. Or it could also be labeled Continue to take the student to the next page.
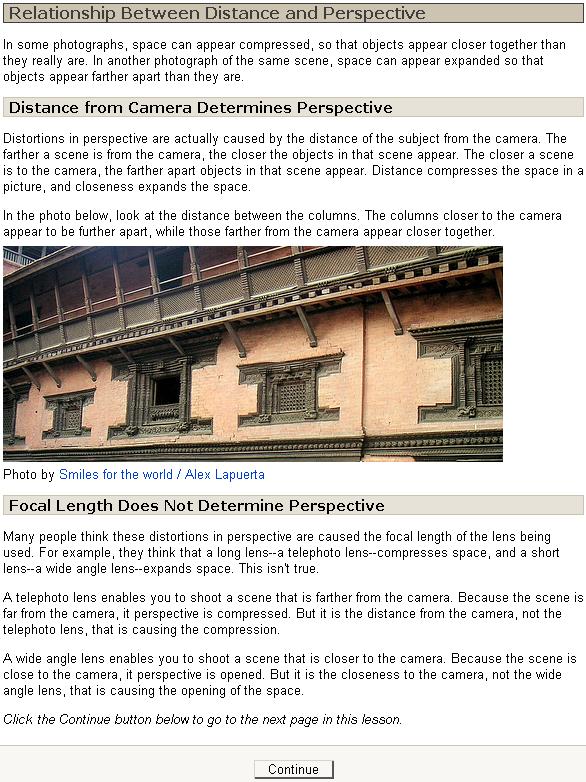
The following is a screenshot of a lesson page. Its purpose is instructional. It appears like any other normal web page. Indeed, you can put anything on a lesson page that you can put on any other Moodle web page.
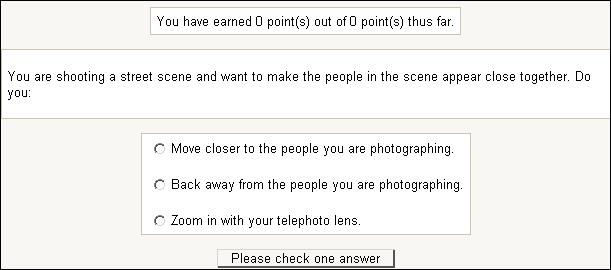
At the bottom of the lesson page is the Continue button. In this lesson, when the student clicks this button, he or she is taken to the following question page:
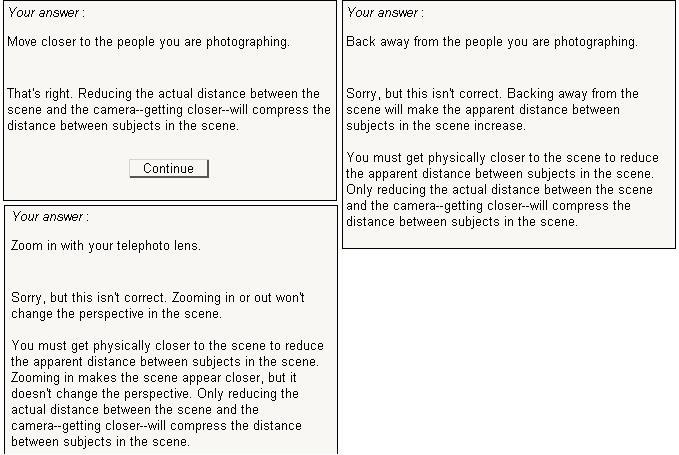
Each answer displays different feedback, just like a quiz:
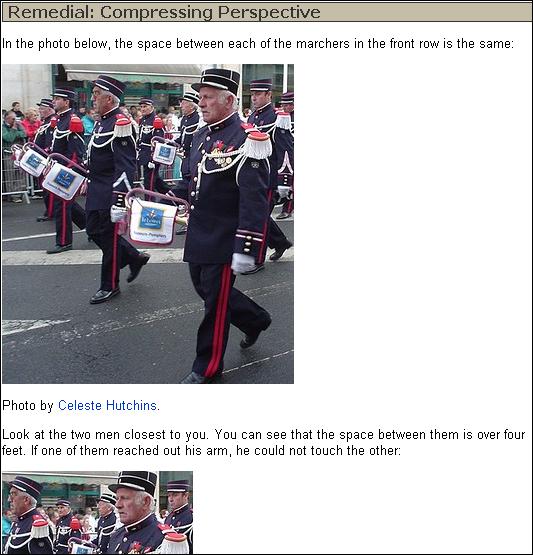
If the student answers correctly, he or she is taken to the next instructional page. An incorrect answer takes the student to a remedial page. The following is an example of a remedial page:
This is the simplest sequence for a lesson in Moodle. You can also add a few more advanced features. We’ll discuss these later, after looking at the basic features.
Lesson Settings
When you first create a lesson, you are presented with a window where you choose the settings for the entire lesson. Before you can add even a single page to a lesson, you must select the lesson settings. If you’re not sure about any of these settings,
just take your best guess. You can always return to this page and change the
settings. Remember, one of the advantages of Moodle is the ease with which you
can experiment with, and change your course material. Get accustomed to taking
a bolder, more experimental approach to using Moodle and you will enjoy it a
lot more.
This window is broken into six areas:
- General
- Grade options
- Flow control
- Lesson formatting
- Access control
- Other
In this section, I’ll go through the Editing Lesson page from top to bottom. I’ll discuss most of the settings, and focus on the ones that are most useful for creating the effect of a deck of flash cards. By the end of this section, you will understand how most of the settings on the Editing Lesson page affect the student’s experience.
General Settings
The following are the settings:
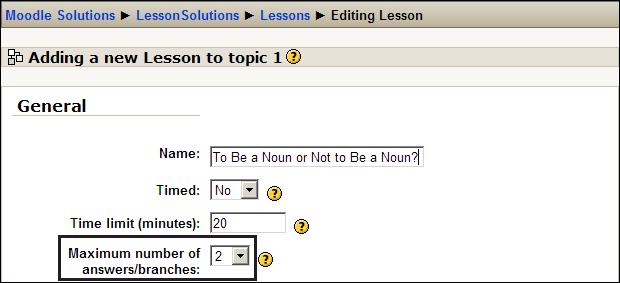
Name
This is the name of the lesson, which students will see on the course’s Home Page.
Time Limit
This is the time limit for the entire lesson, and not for each individual page. Enabling this displays a timer, with a countdown. The timer uses JavaScript; so to use this feature, your students must have JavaScript installed and enabled in their browsers.
When the time limit is reached, the student is not ejected from the lesson. The student remains in the lesson. However, any question that the student answers after the time limit is reached does not count towards the student’s grade.
Maximum Number of Answers/Branches
At the bottom of each question page in a lesson, you can place a quiz question. Maximum number of answers/branches determines the maximum number of answers that each question can have. If each answer sends the student to a different page, then the number of answers is also the number of branches possible. For true/false questions, set this to 2. After creating question pages, you can increase or decrease this setting without affecting the questions that you have already created.
Grade Options
If a lesson is being used only for practice, most of the grade options are irrelevant.
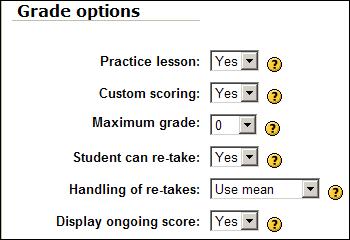
Practice Lesson
If you set Practice lesson to Yes, this lesson will not show up in the Gradebook.
Custom Scoring
Normally, a correct answer in a question is worth the entire point value for the question, and each wrong answer is worth zero. Enabling custom scoring allows you to set a point value for each individual answer in a question. Use this if some answers are ‘more right’ or ‘more wrong’ than others. You can also use this to set the point value for a question. If a question is more important, use custom scoring to give it more points.
Maximum Grade
If you set Maximum grade to 0, the lesson does not appear in any of the Grades pages. The student’s score in this lesson will not affect the student’s final grade for the course.
Student Can Re-take
This setting determines if the student can repeat the lesson.
Handling of Re-takes
This setting is relevant only if the student is allowed to repeat the lesson (the setting above is set to Yes). When the students are allowed to re-take the lesson, the grades shown in the Grades page are either the average of the re-takes or the student’s
best grade.
Display Ongoing Score
When this is set to Yes, each page of the lesson displays the student’s score and the number of possible points so far. Note that this displays the number of points that the student could have earned for the pages that he or she has viewed so far.
If a lesson is not linear (that is, if it branches), then the path that each student takes through the lesson can change. This means that each student can have the chance to earn a different number of points. So in a branching lesson, the ‘total number of points possible for the entire lesson’ is not meaningful because the lesson can be different for different students. For example, you might create a lesson with many branches and pages. Then, require the student to earn at least 200 points on that lesson. This would encourage the student to explore the lesson, and try different branches until he or she has earned the required points.
Flow Control
Some of the options under Flow control make the lesson behave more like a flash card deck. Other settings on this page become irrelevant when a lesson is used for flash cards.
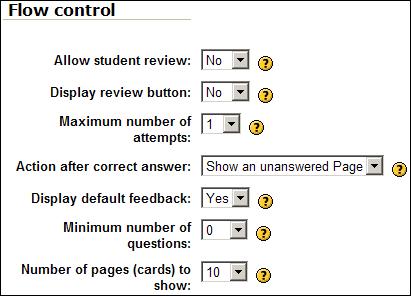
Allow student review enables a student to go backwards in a lesson, and retry questions that he or she got wrong. This differs from just using the Back button on the browser, in that the setting enables the student to retry questions while using the Back button does not.
Look at the setting for Action after correct answer. Note that in this case, it is set to Show an unanswered Page. This means that after a student answers a question correctly, Moodle will display a page that the student either hasn’t seen or has answered incorrectly. The Show an unanswered Page setting is usually used during a flash card lesson to give the student second chances at answering questions correctly. During a practice lesson, you will usually use Allow student review to enable students to go back to questions they got wrong.
Display review button displays a button after the student answers a question incorrectly. The button allows the student to re-attempt the question. If your questions have only two answers (true/false, yes/no), then allowing the student to retry a question immediately after getting it wrong doesn’t make much sense. It would be more productive to jump to a page explaining why the answer is wrong, and use the Show an unanswered Page setting to give the student another chance at the question at a later time.
Maximum number of attempts determines how many times a student can attempt any question. It applies to all questions in the lesson.
Minimum number of questions sets the lower limit for the number of questions used to calculate a student’s grade on the lesson. It is relevant only when the lesson is going to be graded.
Number of pages (cards) to show determines how many pages are shown. If the lesson contains more than this number, the lesson ends after reaching the number set here. If the lesson contains fewer than this number, the lesson ends after every card has been shown. If you set this to 0, the lesson ends when all cards have been shown.
Lesson Formatting
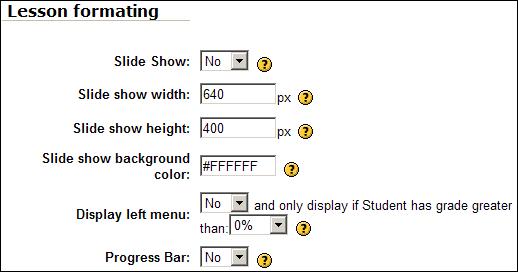
The settings under Lesson formatting are used to turn the lesson into a slide show, which appears in a pop-up window. The Slide Show setting creates the slide show window. Slide show width, height, and background color set the format of the slide show. The background color setting uses the Web’s 6-letter code for colors. This code is officially called the ‘Hex RGB’. For a chart of these color codes, try a web search on the terms ‘hex rgb chart’, or see a partial chart at http://www.w3.org/TR/2001/WD-css3-color-20010305#x11-color.
Display left menu displays a navigation bar on the left side of the slide show window. The navigation bar enables the student to navigate to any slide. Without that navigation bar, the student must proceed through the slide show in the order that Moodle displays the lesson pages, and must complete the lesson to exit (or the student can force the window to close). Sometimes, you want a student to complete the entire lesson in order, before allowing him or her to move freely around the lesson. The setting only display if Student has grade greater than accomplishes this. Only if the student achieved the specified grade will he or she see the navigation menu. You can use this setting to ensure that the student goes completely through the lesson the first time, before allowing the student to freely move around the lesson. The Progress Bar setting displays a progress bar at the bottom of the lesson.
Access Control
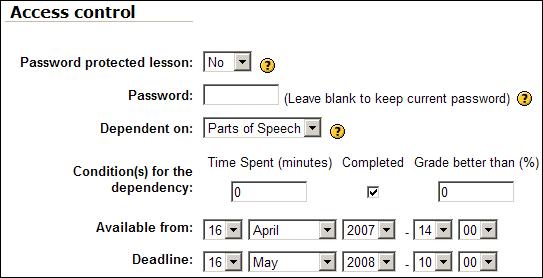
However, recall that in the beginning of the chapter, we learned that lessons are the only activity that can be made dependent on completing another activity. That is, you can require that the student completes a specific lesson in your course before allowing him or her access to the current lesson. Now, look at the Dependent on setting in the following screenshot:
Pop-Up to File or Web Page
The following is what this page looks like:
When the student launches the lesson, you can make a new web page or file launch with the lesson. This page or file will launch in a separate window. This enables you to use the page or file as the focal point for your lesson. For example, you could launch an animation of a beating heart in a pop-up window, and use the lesson to point out parts of the heart, and quiz the student on what each part does during
the heartbeat.
Moodle will display the following file types in their own viewer:
- MP3
- Plain Text
- Media Player
- GIF
- Quicktime
- JPEG
- Realmedia
- PNG
- HTML
File types for which Moodle does not have a built-in viewer get a download
link instead.
Even if your file type is supported by one of Moodle’s viewers, you might want to embed the file in a web page instead. Putting the file on a web page enables you to write an explanation at the top of the page, say, ‘You will refer to this graphic during the lesson. Reposition this window and the lesson window, so that you can see both at the same time, or easily switch between the two.’
If you combine this with the Slide Show setting (the screenshot on the last page), you’ll have the Moodle slide show displayed in one window, and the file specified here displayed in another.
Other Lesson Settings
The Other settings area has some settings that can make the lesson more interesting for the student.
Notice in this screenshot, Link to an activity is set to workshop – Example:
Pre-correction in a Workshop. This setting places a link on the last page of the lesson to the activity or resource specified. The drop-down list for Link to an activity contains all of the resources and activities in the current course. The user must click the link to be taken to the location, so this setting doesn’t force the user to proceed to a specific place after the lesson.
Number of high scores displayed lets the high scoring students choose a name to post their scores under. This setting doesn’t do anything if you make the lesson a Practice lesson.
When you are creating a lesson, you see all of the pages in the lesson in their logical order. The logical order is the order in which a student would see them, if the student answered every question correctly and proceeded straight through the lesson. At any time, you can preview the lesson from the student’s point of view. This section will cover previewing a lesson.
A lesson can be graded or ungraded. It also can allow students to retake the lesson. While Moodle allows you to grade a lesson, remember that a lesson’s primary purpose is to teach, not test. Don’t use a lesson to do the work of a quiz or assignment. The lesson’s score is there to give you a feedback on the effectiveness of each page, and to enable the students to judge their progress.
Adding the First Question Page
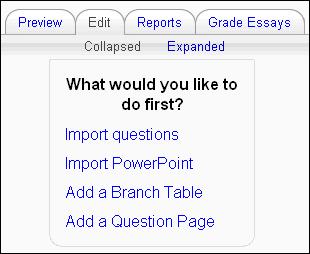
Immediately after you save your lesson settings, Moodle presents you with the following page:
At this point, it is time to create the first question page or import question pages from another system. Let’s take a look at each of your options.
Importing Questions
If you choose to Import questions, you can import questions created by Moodle and other online learning systems. Some of the formats that you can import are:
- GIFT and Moodle XML
These are Moodle’s proprietary formats. GIFT is text only, and XML can include graphics and special characters.
- Aiken
This format is for multiple choice questions.
- Missing Word
This format is for missing word multiple choice questions.
- Blackboard
If you’re converting from Blackboard to Moodle, you can export questions from Blackboard and import them into Moodle.
- WebCT
This format supports multiple choice questions, and short answers questions from WebCT.
- Course Test Manager
If you’re converting from Course Test Manager to Moodle, you can export questions from Course Test Manager, and import them
into Moodle.
- Embedded Answers (Cloze)
This format is a multiple question, multiple-choice question with embedded answers.
Each question that you import will create a lesson page.
Importing PowerPoint
If you’ve created a complex PowerPoint presentation—with animations, special text effects, branching, and other advanced features—don’t expect to import those advanced features into a Moodle lesson. Basic text and graphics will import from PowerPoint into Moodle, but advanced features are lost.
Also, before you import your PowerPoint slideshow, you must export it as a series of web pages. This ability is built into PowerPoint. So it is not difficult, and does not require additional software. But you should be aware that Moodle does not read PowerPoint files directly. Instead, it reads the web pages that PowerPoint exports.
Add a Branch Table
A branch page consists of a page of links to the other pages in your lesson. At this point, immediately after you’ve finished the lesson settings page, your lesson
doesn’t have any pages. So adding a branch table at this point doesn’t make much sense. Let’s deal with branch tables later, after we’ve added some question pages to the lesson.
Add a Question Page
This option enables you to add a question page to your lesson, using Moodle’s built-in editor. The process for creating a question page is covered in the next section, Creating the Question Pages.
Creating the Question Pages
After you fill out and save the Settings page, it is time to create the first question page. Even though it’s called a ‘question page’, the page can contain more than just one question. It’s a web page, so you can add any content to it. Usually, it contains information and a question to test the student’s understanding. You can choose different types of questions:
- Multiple choice
- True/false
- Short answer
- Numeric
- Matching
- Essay
You can also create feedback for each answer to the question, similar to creating feedback for the answers in a quiz question. And, you can make the lesson jump to a new page, based upon the answer the student selects.
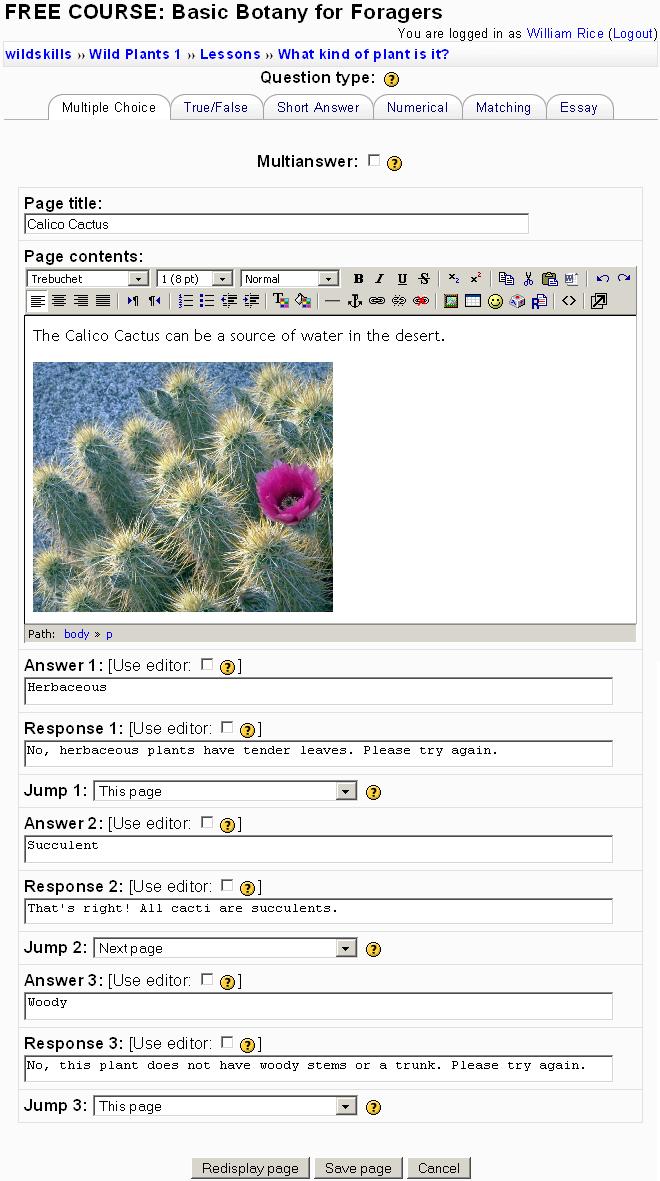
In the following example, you can see the question page contains some text, a graphic, and three answers to the question. Note that for each answer, there is a Response that the student sees immediately after submitting the answer. And, there is also a Jump for each answer. For the two incorrect answers, the Jump displays the same page. That allows the student to try again. For the correct answer, the Jump displays the next page in the lesson.

Page Title
The Page title will display at the top of the page when it is shown in the lesson.
Page Contents
As was said before, a lesson page is really a web page. It can contain anything that you can put on any other Moodle web page. Usually, it will contain information, and then a question to test the student’s understanding.
Answers
The answers will be displayed at the bottom of the lesson page, after the Page contents. The student selects and answers in response to the question posed in the Page contents.
Responses
For each Answer that the student selects, its Response is shown before the student is taken to a new page.
Jumps
Each Answer that a student selects results in a Jump to a page.
This Page
If Jump is This page, the student stays on the same page. The student can then try to answer the question again.
Next or Previous Page
If Jump is Next page or Previous page, the student is taken to the next or previous page. After you rearrange the pages in a lesson, this jump might give you different results. Just be aware that this is a relative jump.
Specific Pages
You can also select a specific page to jump to. The pull-down list displays all the titles of the lesson page. If you select a specific page to jump to, the jump will remain the same, even if you rearrange the pages in your lesson..
Unseen Question within a Branch
Recall that a Branch Table is a Table of Contents, listing the pages in a lesson. When you insert a Branch Table into a lesson, you can also insert an End of Branch later in the lesson. The pages between the Branch Table and End of Branch become a branch. For example, a lesson with two branches might look like this:
Branch Table 1
Question Page
Question Page
Question Page
End of Branch1
Branch Table 2
Question Page
Question Page
Question Page
End of Branch 2
For a Jump, if you select Unseen question with a branch, the student will be taken to a question page that he or she has not yet seen in this session. That question page will be in the same branch as the current page.
Random Question within a Branch
For a Jump, if you select Random question within a branch, the student will be taken to a random question page in the same branch as the current page.
In the Lesson Settings page, if Maximum number of attempts is set to something greater than 1, the student might see a page that he or she has seen before. But a page will be repeated only if Maximum number of attempts is greater than 1. If it’s set to 1, a random question page that the student has not seen before will be displayed, which has the same effect as choosing Unseen question within a branch.
To restate this, when the lesson setting Maximum number of attempts is set to 1, then Random question within a branch acts exactly like an Unseen question within a branch. When Maximum number of attempts is set to greater than 1, then Random question within a branch displays a truly random question page.
One strategy for using this setting is to forgo the use of Unseen question within a branch. Whenever you want to use Unseen question within a branch, instead use Random question within a branch and set the Maximum number of attempts to 1. Then you have the option of converting all of your lessons to random jumps just be setting Maximum number of attempts to 2 or greater.
Random Branch Table
Recall that a Branch begins with a Branch Table, has one or more question pages, and then ends with an End of Branch page. You can nest branches within branches.
If Jump is Random branch table, the student is taken to a random Branch Table between the current Branch Table and the End of Lesson or the next End of Branch.
Create Pages and Then Assign Jumps
When filling out a question page, Answer 1 is automatically assumed to be the correct answer, so Jump 1 automatically reads Next page. This is because in most cases, you want a correct response to result in the next page in the lesson being displayed. However, you can select any existing page in the lesson for the jump. Note that when you are filling out the first question page, there are no other pages to jump to, so all the jumps on the first page will direct to This page. After creating more pages, you can go back and change the jumps.
It is usually most efficient to create all of your question pages first, and then go back and assign the jumps.
The jumps that you create will determine the order in which the pages are presented to the student. For any answer, you can select a jump to the last page of the lesson. The last page displays an End of Lesson message and, if you choose, the grade for the lesson. It also displays a link that takes the student back to the course’s Home Page.
The Flow of Pages
The most obvious usage of question pages and jumps is to enforce a straight-through lesson structure. A correct answer results in a positive response such as ‘That’s correct!’, and then jumps to the next page. An incorrect answer results in a negative response or a correction. An incorrect answer can then redisplay the page, so the student can try again, as in the previous example, Jump 1: This page. Or, an incorrect answer can jump to a remedial page.
The order of pages the student would follow if he or she has answered every question correctly is called the logical order. This is how the teacher sees the lesson while editing it and displaying all of the pages in the same window.
Question Pages without Questions
You are not required to add a question to a Question page. If you omit the question, Moodle displays a Continue link that takes the student to the next page. This is useful on remedial pages, where you want to ensure that the student returns to the main lesson flow. It is also useful if you want to create a click-through demo, or other series of informational pages.
It is also useful if you want to enforce the reading of material in a certain order. Recall that on a course’s Home Page, course material can be read in any order. However, using a lesson, you can enforce a given order for the reading of course material. If you want to enforce a particular order for the entire course, you can make the course one big lesson. This is as close as Moodle comes to a commercial learning management system’s ability to enforce an order of material on a course.
Editing the Lesson
After you’ve created several lesson pages, you might want to see and edit the flow of the lesson. You can do this under the Edit tab.
Collapsed and Expanded
The Edit tab is where you edit the contents of your lesson. From here, you can add, delete, rearrange, or edit individual lesson pages.
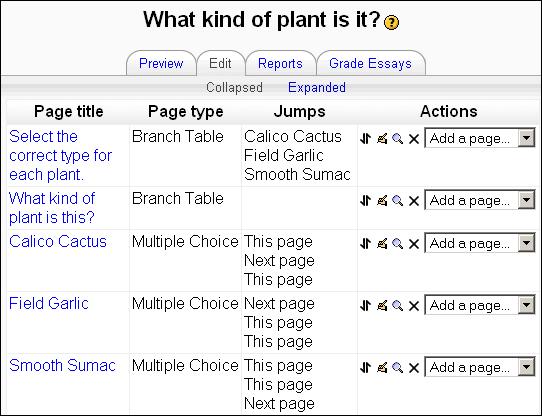
Under the Edit tab, when you select Collapsed, you see a list of the pages in your lesson like the one shown in the following screenshot:
The pages display in their logical order, which would be the shortest path through the lesson if a student got all of the questions correct. Note that the contents of the pages do not display. The purpose of this screen is not to edit individual questions, but to help you see the flow of the lesson.
Rearranging Pages
To rearrange the pages, click the up/down arrow to go to the page you want. Note that it is the jumps that determine the order in which Moodle presents the pages. If a question is set to jump to the next page, rearranging the pages can change the jumps. A question can also be set to jump to a specific, named page. In that case, the order in which the pages appear doesn’t determine the landing point for the jump. So, rearranging the pages here won’t affect that jump.
Editing Pages
From the Edit tab, to edit a page, click the edit icon(a hand holding a pen). Clicking this takes you to the editing page of that page. The previous section gave detailed instructions for editing a lesson page.
Adding Pages
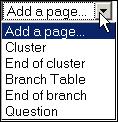
The Add a page here drop-down list enables you to insert a new page into the lesson. You can choose from several different kinds of pages.
A question page is the normal, lesson page.
As stated before, a Branch Table is a page that contains links to other pages in your lesson. Those pages will be between the Branch Table and the End of branch. We’ll discuss more on branches in the next section.
A Cluster is a group of question pages, where one is chosen at random. You do not proceed through a Cluster like you do a branch. Instead, you hit one random page within a Cluster, and then you’re out of the Cluster or back to the beginning.
Branch Tables
You can add a branch page, which enables students to jump to pages in your lesson. A branch page consists of a page of links to the other pages in your lesson. This page of links can act as a table of contents. For example, suppose you’re developing a lesson on William Wallace. The traditional way of teaching about a person’s life is to organize the information in a timeline. That would be easily accomplished with a straight-through lesson like the one just described.
But suppose you wanted to teach about the different areas of a person’s life, and they do not all fit well on a timeline.
For example, Wallace’s historical achievements would fit well on a timeline. But a timeline might not be the best way to teach about Wallace’s personal beliefs and religion. Wallace’s family might fit well on a timeline. But background information about the culture and society in which he lived might not. A straight-through
lesson might not be the best way to present Wallace’s life. Instead, you might use
a branch table.
In this Branch Table, each branch could be an aspect of Wallace’s life: historical achievements, personal beliefs, family, the world in which he lived, and so on. At the beginning of the lesson, the student would choose a branch to explore. At the end of each branch, the student would choose between going back to the branch table (beginning of the lesson), or exiting the lesson.
You can mark the end of a branch with an End of Branch page. This page returns the student back to the preceding Branch Table. You can edit this return jump, but most leave it as is. If you do not mark the end of a branch with an End of Branch page, you will proceed out of the branch and to the next question.
