Gradebook management
Viewing Grades
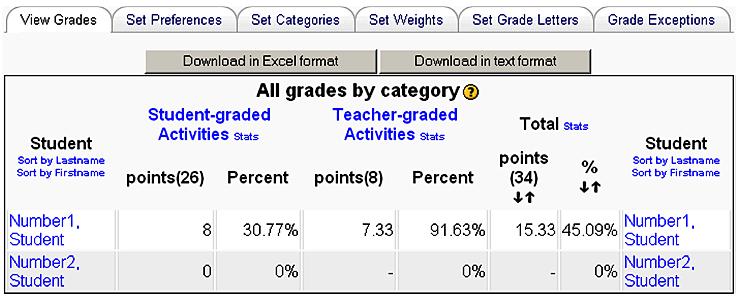
To access grades, select the course whose grades you want to see, and then select Grades from the Administration block. This displays a summary of the gra des for that course:
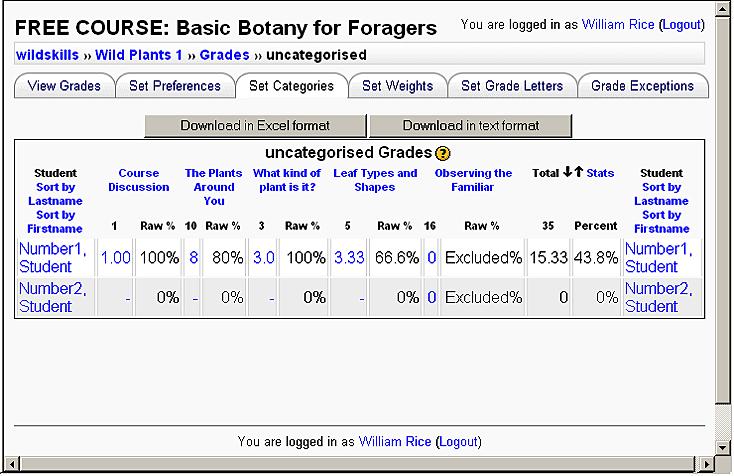
Notice that Student 2 has not completed any of the assignments in this course. Student 1 has earned a total of 15.33 points out of a possible 35. We know that all of the grades are Uncategorised, because that is the only category with a link. To investigate the grades further, click the Uncategorised link and the detailed grades will display:
Now you can see why Student 1’s overall grade is so low. For the assignment Observing the Familiar, the student has a grade of 0 out of a possible 16 points. We know the student has not completed that assignment because Excluded displays where the percentage would be. If the student has completed the assignment but earned zero points, then 0% would display instead.
Categorizing Grades
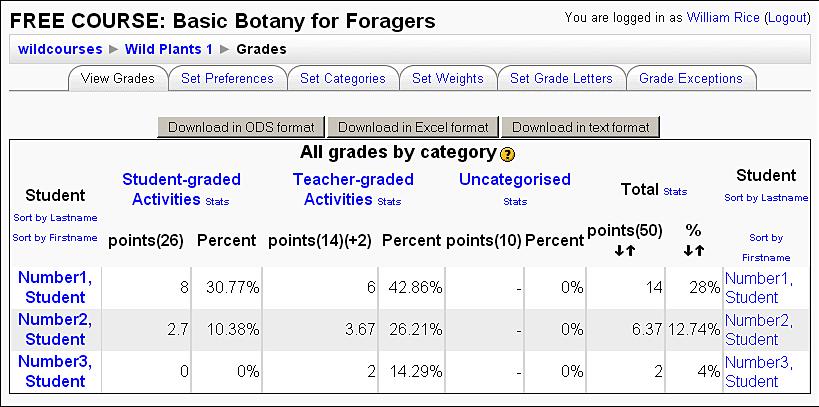
Each of the graded activities can be put into a category. Note that you put activities into categories, not students. If you want to categorize students, put them into groups. Categorizing the graded activities in a course enables you to quickly see how your students are doing with various kinds of activities. If you do not assign an activity to a category, by default it belongs to the category Uncategorised. The following screenshot shows a course that uses the default categories of Student-graded, Teacher-graded, and Uncategorised. These are built into Moodle, and the system automatically assigns activities to the correct category as you create the activities:
Creating and Viewing Categories
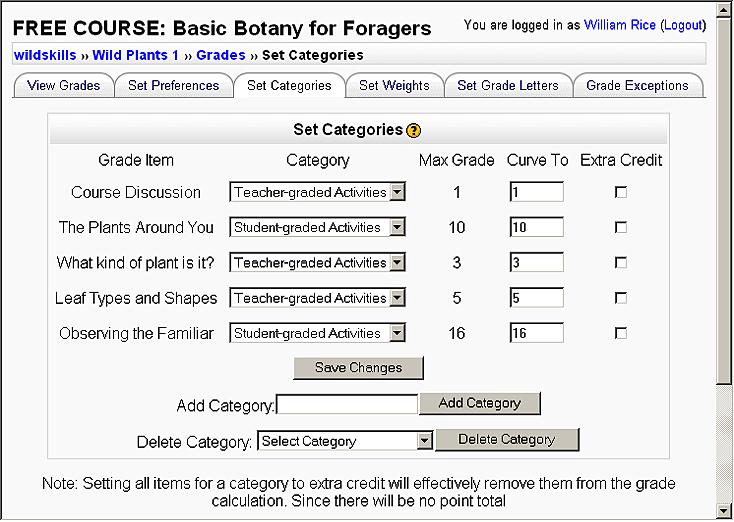
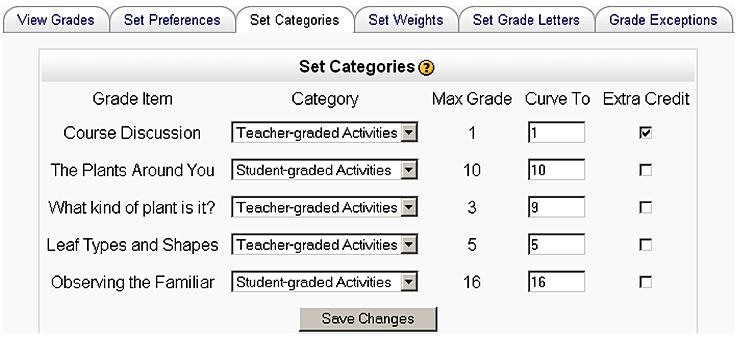
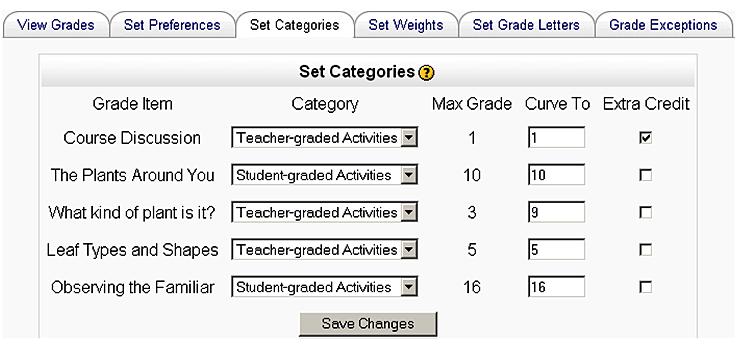
In the next example, the Set Categories tab has been selected. This is where you would assign and create grade categories for the activities in your course:
The most important point here is to determine what kind of question you want to answer when you examine student grades, and create categories that enable you to answer that question. For example, ‘How do my students do on quizzes versus more interactive activities, like workshops and forums?’ To answer that question, create a category just for quizzes, and you can answer that question just by viewing the grades. Or, ‘How do my students do on offline activities versus online activities?’ To answer that question, create online and offline grading categories. And remember, these categories are not ‘written in stone’. If your needs change, you can always create and assign new grading categories as required.
Using Extra Credit
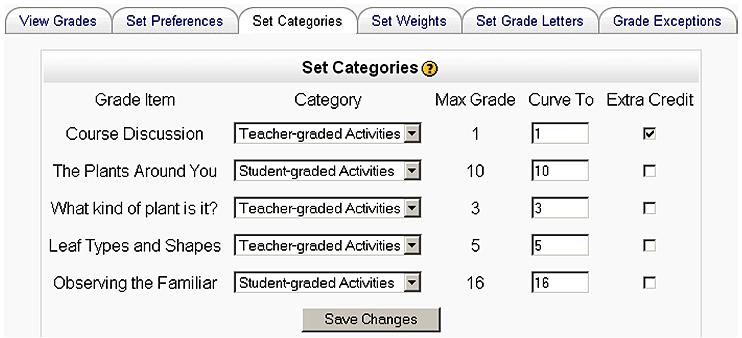
You can designate any activity as extra credit under the Set Categories tab. In this example, I’m setting the Course Discussion as Extra Credit:
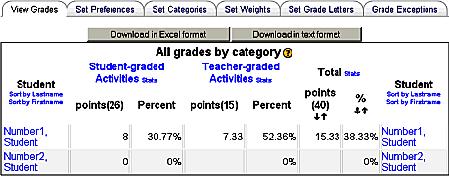
In an earlier screenshot, you saw that the category Teacher-graded Activities had a total of 9 points possible. Now that the Course Discussion has been designated as Extra Credit, this category has a total of 8 points possible:
While it may be tempting to create a category just for extra credit activities, Moodle recommends against making all of the activities in a category extra credit. This might cause errors in the program, and might cause those activities to not even register. Instead, use the extra credit setting on selected activities.
Grading on a Curve
The Set Categories tab gives you the ability to grade any activity on a curve. This means that instead of the activity receiving the total number of points set in the activity’s Settings page, it receives the number of points that you enter under the Set Categories tab. In this example, I’ve assigned the three-question quiz 9 points. Each question in the quiz now contributes three points to the total grade:
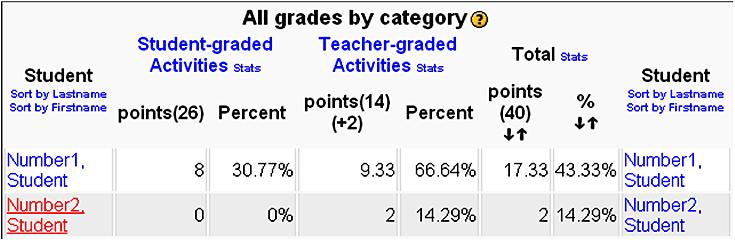
Looking under the View Grades tab, you can see that now the total number of points for Teacher-graded Activities has changed from 9 to 15:
When to Use Curve and When to Use Weight
Grading on a curve is a convenient way to compensate for a single activity that proved too easy or too difficult. For example, if all of your students did poorly in a quiz, you could curve the quiz to a lower number of points, or even give it zero points. Your students could still see their quiz grades, but the zero points would eliminate them from their total grade.
Under the Set Weights tab, you can hide an entire category of activities so that their grades are not displayed to the students, and are not used in the total calculation. A curve affects just a single activity, and still enables students to see their grades.
Use a curve when you want to adjust the amount that a single activity contributes to the total. Use weighting (covered in the next subsection) when you want to adjust the amount that an entire category contributes to the total.
Compensate for a Difficult or Easy Category by Weighting Grades
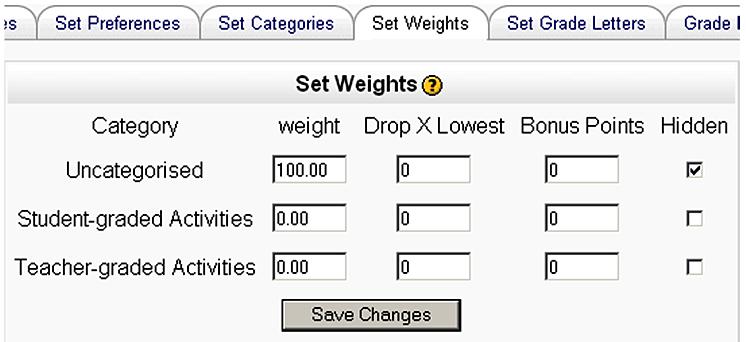
The Set Weights tab contains several settings to help you adjust how much a category contributes to the point total. You can use these settings to compensate for an especially difficult or easy category.
Weight
You can assign a weight to a grade category. By default, a weight of 100 is applied to the Uncategorised category. This doesn’t mean that none of the other categories count towards the total. It means that each category is outweighed:
Hide Ungraded Activities
Under the Set Weights tab, selecting the Hidden checkbox removes a category from display and also from grade calculation. This is an easy way to add items to the grade calculation only after they have been graded. Just keep an activity hidden until you’ve graded it. After grading, unhide the activity. It then becomes visible to the students and is used in the grade totals.
Dropping the Lowest Scores in a Category
Weighting is intended to enable you to adjust the scores in an entire category of activities, when those activities have proven too difficult or too easy. One way to do this is giving a category a lower or higher weight than the others. Another way to improve the scores in a difficult category is to use Drop X Lowest to drop the lowest scored activities from that category’s grades. Before using this feature, make sure every activity in that category has the same point value. The setting will work
when the activities have different values, but the results become meaningless. For example, in the next screenshot, you can see that there are three Teacher-graded Activities, each with a different point value. If you use Drop X Lowest to drop the lowest-scored activity from that category, the score for Course Discussion would almost always be dropped because a perfect score of 1 would still be lower than a bad score in What kind of plant is it? or Leaf Types and Shapes.
Giving Bonus Points
The Set Weights tab enables you to give all bonus points to every student’s total grade in a category. This is a good way to compensate for a category of activities that was too hard. The bonus points show up on the View Grades tab. Note the +2 displayed for the Teacher-graded Activities:
Points, Percents, and Letter Grades
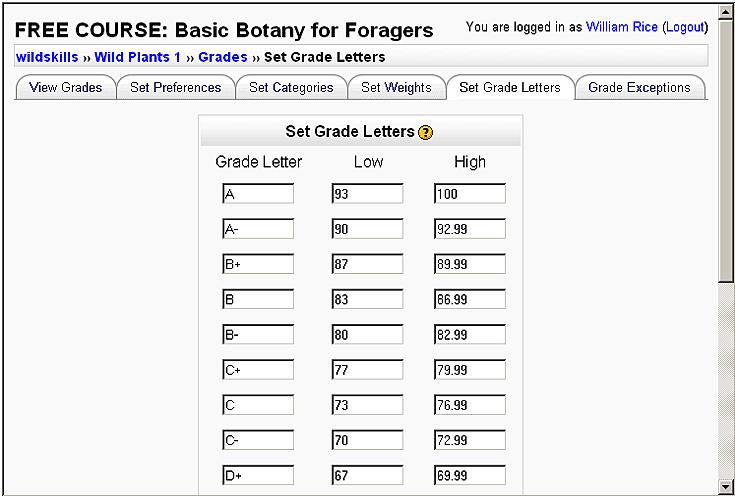
The Set Grade Letters tab enables you to determine the percentages that apply to each letter grade. Moodle comes with suggested values. You can change these at any time, for any course. Note that your change applies only to the course with which you are working:
In this screenshot, I used the traditional letter grades. I could have entered any text under Grade Letter instead. For example, instead of A, I could have entered Excellent and instead of B, I could have entered Above Average, and so on.
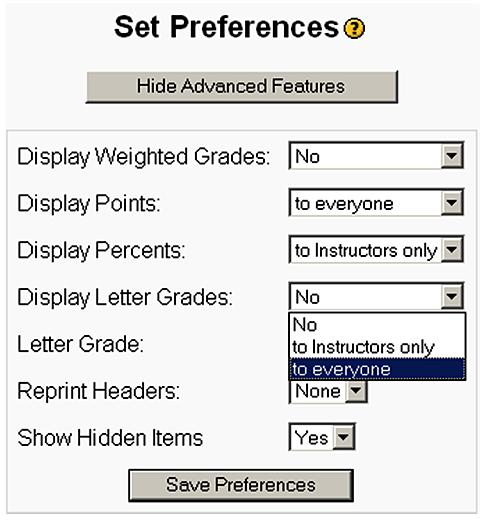
To display letter grades to students and teachers under the Set Preferences tab, select those who can view the letter grades.
In the same window, select who can view the points and percentage scores. Take special note of the setting for Show Hidden Items. If this is set to Yes, even though a category has been hidden, it will show to the students. You probably want to keep this set to No because if you’re hiding a category, the intent is that students will not see it. The setting Letter Grade determines whether letter grades are calculated based on raw percentages or weighted percentages.
For example, you could choose No for Display Weighted Grades, and let students see their true percentages. Then, select Use Percent for Letter Grade, so that students can see what grade they’ve earned after the weighting is taken into account.


