Creating New Questions
There are a few ways to access the question bank editing tools:
1. Click on the link to access a quiz activity you have previously created then click on the button labeled, “Update this Quiz”
2. On your main course page, click the button to “Turn editing on” then click on the edit tool next to a quiz activity that you have previously added, or. . .
3. Click on the “Questions” link found in the Administration block of your main course page.
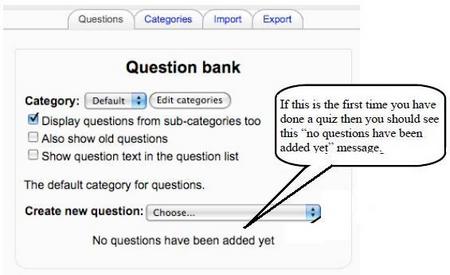
If you choose the third option, you should see a page that appears similar to:
- Add a Category
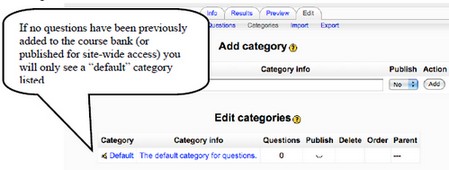
- Just as with other files and content that you place in your course, it is important to also organize your questions to make them easy to find and use at later dates. Toward this end, let’s first set up a category or two in which to place the questions you create. Click on the tab marked “Categories”

- To add a category, pick a parent category. “Top” means it will be a top-level category. As soon as you create a category, the name will be added to the “parent” list so that you might create a subcategory for that “top” level category. Type a name in the “Category” blank. “Category Info” is optional but useful to remind you what questions you plan to include in this category. Under “Publish” a “yes” choice will make this category available to other course creators on the system. For example, if you are one of several English 10 teachers and you all follow a similar curriculum, it might be useful to collaborate and share quiz questions among all teachers, rather than having each teacher create his/her own. Finally, click the “Add” button to complete the process of adding a category
- You can move questions between categories later on, or even create new subcategories within other categories to help in your organization of questions for easy access when creating quizzes and tests.
- Just as with other files and content that you place in your course, it is important to also organize your questions to make them easy to find and use at later dates. Toward this end, let’s first set up a category or two in which to place the questions you create. Click on the tab marked “Categories”
- Create a Question
There are several types of questions available for development in Moodle. The most common questions may be multiple choice and essay question types, but others are useful, too. It is important to remember that creating questions does not automatically put them on a quiz. Rather, you are building an “item bank” from which you can later choose questions to add to quizzes or tests that you may create for different purposes. A brief description of the question types in Moodle follow:
- Calculated – A way to create individual numerical question by the use of wildcards that are substituted with individual values when the quiz is taken. For example, you may want to include a three-digit addition problem, but a different one for each student (or a different one for each attempt a student makes). This type of question will allow you to define a set of variable sets that might be used to feed this question.
- Essay – In response to a question (that may include an image), the student writes (using the provided text editor) a response. (This, of course, must be manually scored by the teacher)
- Matching – A list of words/phrases is provided along with a list of answers. One matching question could be assigned as worth many points since it will appear to be a single question for all matching responses in the group.
- Embedded Answers (Cloze) – These are questions where the answers (select from list or short answer) are embedded directly in text sentences. It takes some care to write these up in the proper syntax to work, but you can access the help screen for this type of question that will provide an example that you can adapt for your own cloze questions.
- Multiple Choice – The question may include an added image and the respondent selects from multiple answers provided. You can create single answer or multiple answer multiple choice questions and customize scoring credit for various responses.
- Short Answer – In response to the question, the respondent types a word or phrase. You enter the possible correct and partially correct responses when you set up this question and can determine case sensitivity, too. If a student provides an answer that is correct but you didn’t think of it before (or a misspelling that you don’t want penalize, you can always override the scoring that is automatically done for any question or add that response and have the system rescore all quizzes taken.
- Numerical – From the respondent’s perspective a numerical question appears the same as a short answer, but you, as creator can control the acceptable range of error. For example, if you ask when the Civil War began, you can set up the question to accept 1861 with an acceptable error range ± 3, making a correct answer essentially anything from 1858 to 1864.
- Random Short-Answer Matching – From the respondent’s perspective this looks just like a Matching question. The difference is that the sub-questions will be drawn from the Short Answer questions in the current category of questions.
- True / False – The respondent selects from two options (true or false) in response to the “question” statement.
- Description – Not a question, but a way to display information about a question or series of questions to embed anywhere within a quiz. e.g., “The following questions pertain to. . .”
Each type of question has a unique development screen suited to building that type of question. Though more detailed directions for creating a multiple choice question follows, we recommend you take advantage of the context help, indicated by the small yellow buttons scattered across most Moodle development pages, for specific directions pertaining to each type of question.
- Building a multiple choice question
- From the “category” drop-down menu on the “Question bank” page, choose a category you created earlier.
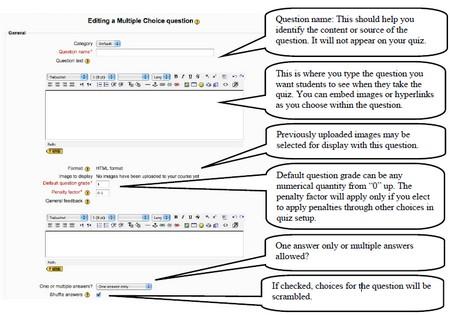
- Now from the “Create new question” dropdown menu, choose “Multiple Choice.” A development screen with several options and text boxes will appear. As shown below, items indicated in red text or with * markings indicate required fields, though some of them have default values already entered.

- In the first large “text editing” box is where you compose the question you want students to see on the quiz. You can control the text size, color and other factors just as you do on your main course page or other html coded pages.
- The second “text editing” box is where you might type some general feedback for this question. If you have chosen to display feedback after each question (Quiz Setup Screen) then every student will see this general feedback once they submit this question. This is optional and is ignored if you have elected not to display general feedback for individual questions.
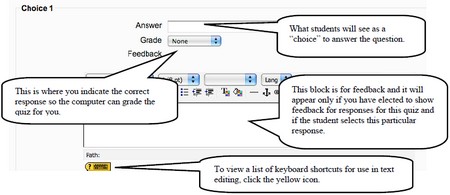
- On the next illustration, you will see where to enter each of the possible choices you wish to include for this question. The actual set up page automatically provides setup for up to five choices for the question. You may choose to add more choices, if your situation warrants and you can use fewer choices (minimum 2), if you wish.
- You must indicate “100%” for one of the choices in the “grade” dropdown menu if you selected “one answer” allowed. You can allow partial credit by indicating a percentage for any other choices. If you elected “multiple answers” for this question you must divide up the grades for all correct answers so the total adds to 100%. (e.g., If three answers are required for correctness, each of those choices should be marked 33.333%.)

- Once you have typed your question, choices and grading selections, click the button marked “Save Changes” at the bottom of the window. Your question name will then appear in a list under the “create new question” drop down menu on the “quiz” or “question bank” pages.
